28. Magnetism, electro-magnetic induction#
28.1. Properties of magnets#
Make an inventory of where we encounter magnets. Does anybody have something with a magnet, to close a bag, or a telephone cover, whatever? It is unlikely that there is no magnet in a bare classroom with students. Then find out where are the poles, what are the shapes of the magnets, which materials are attracted and which are not, etc.
28.2. Magnetizing a needle#
Once there is a magnet in the classroom, there would also be a needle that can be magnetized. Just rub with the magnet along the tip of the needle and then try whether the needle can now also attract or be attracted to iron objects.
28.3. Magnet in mobile phone holder#
The function is to sense when the phone is used and when it is closed in order to switch the screen on and off thus preserve battery charge. There are more magnets in the phone, such as in the microphone and in the speakers to convert sound into electric signals (microphone) and the other way around (speakers).
28.4. Compass#
Does anybody have a pocket knife with a compass? Show inclination and declination. Use the compass to indicate North, is that really the true geographical North? If there is a globe in the room, you can indicate the difference between magnetic and geographical North pole. The magnetic one is somewhere between Greenland and Canada. Use strings on the globe to make the declination visible on the surface of the globe, one string from your location to the geographic North pole, and one from your location to the magnetic pole. The difference in direction is the angle between the strings. Can you point to a location on the globe for which the declination is 180 degrees? And a location for which declination is 0 degrees?
28.5. Generator 1#
Is there a student in the room who still has a bicycle with an old-fashioned dynamo and working lights? Agree with the student that next lesson (s)he takes the bicycle to the classroom. Show how the light intensity varies with the speed of the wheel. You might only see one wire but there are clearly two poles and two paths for the current, point out how that works on this particular bicycle.
28.6. Generator 2#
Of course, I do hope you have proper demonstration equipment to demonstrate a generator and an electric motor.
28.7. Electric motor#
One of my teacher education students made a functioning electric motor using one battery, some Neodymium magnets and a copper wire bent in a clever way (Figure 1). A more reliable design is shown in a simple video. Yet more clear instructions can be found here.
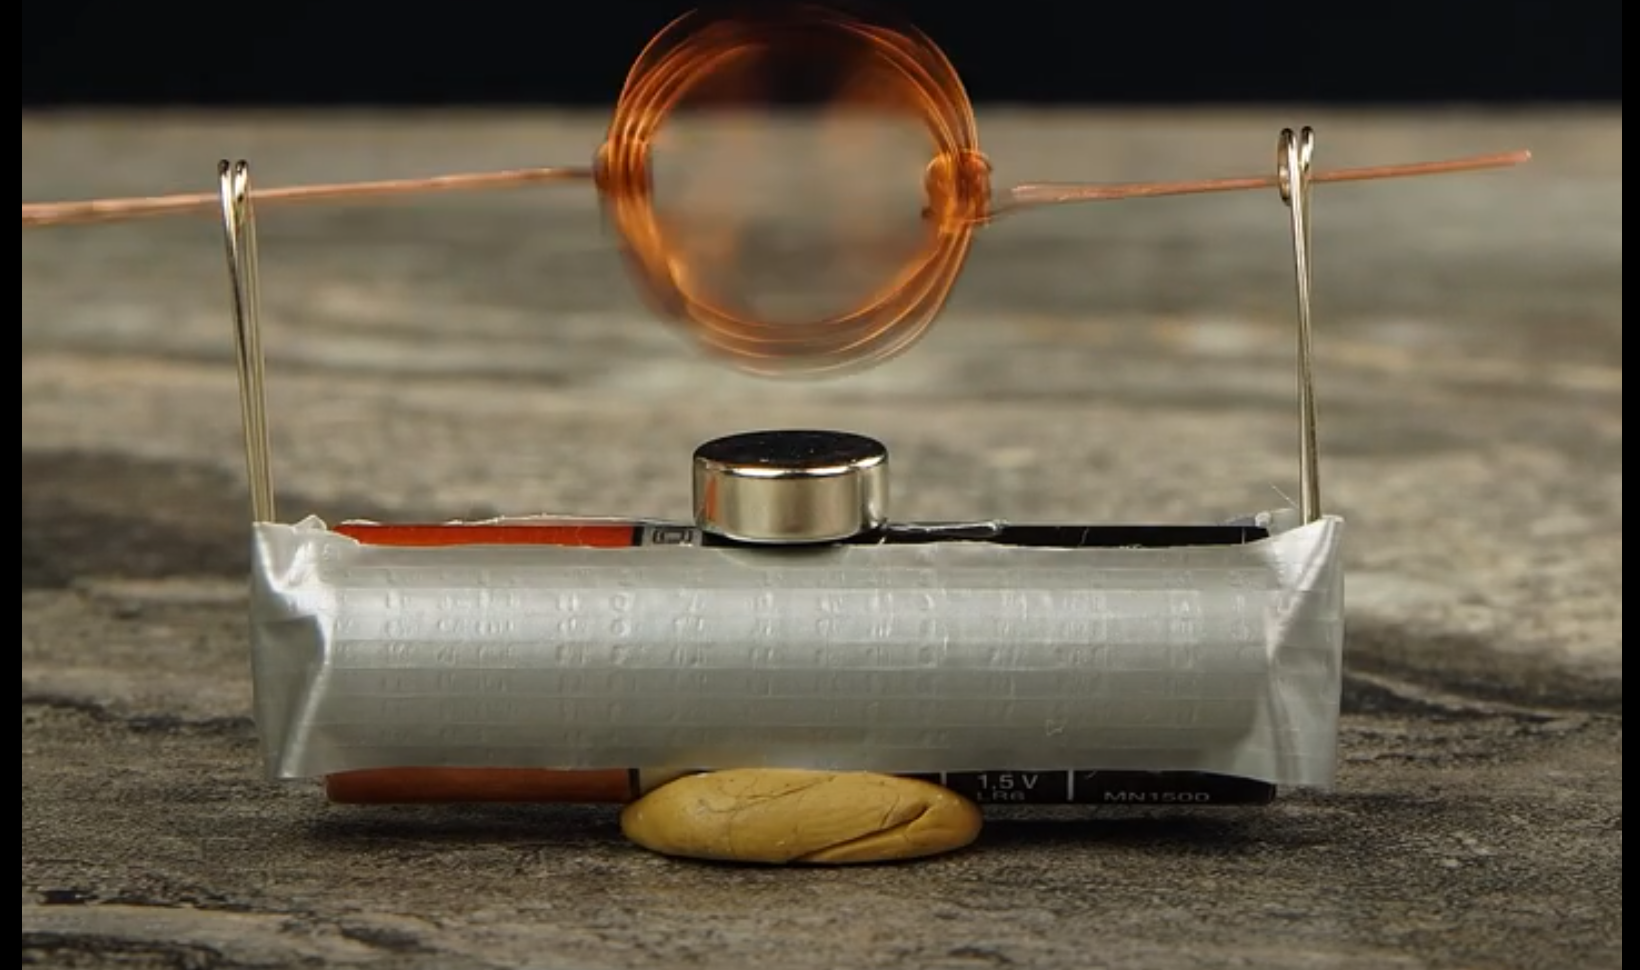
Fig. 28.1 Making a simple electric motor with a battery, wire and magnet.#
28.8. Visualizing magnetic fields in coils#
Use any kind of rope available or even the long strap of a bag and illustrate how one could wind a coil for clockwise or anti-clockwise current. Use the righthand rules to show how to find the direction of the magnetic field generated by a winding if the direction of the current is known.
28.9. Visualizing magnetic fields around wires#
Let a student in front of the class each hold a rope or bar vertically. Imagine that these are current carrying wires with the current going up in both ‘wires’. Let another student illustrate application of the right-hand rule to find the direction of the magnetic field of each of the wires. With equal and parallel wires, do the fields between the wires add up or subtract? Now imagine opposite directions, let the student again illustrate the right-hand rule. Do the fields in between add up or subtract?
28.10. Visualizing the Lorentz force#
Same situation as above, let a student use the right hand to illustrate the direction of Lorentz force on each wire, both in the parallel case (attraction!) and the anti-parallel case (repulsion). If you do have the equipment, then show!
28.11. Lorentz force in a coil#
You always have your slinky with you. Hold the top end so the slinky is suspended from your hand. Propose that the direction of the current in this ‘coil’ is from right to left in the part of the slinky facing the students. Now let pairs of students figure out the direction of the Lorentz force on two successive windings. If there were a current, would the slinky become shorter or longer? If you do have the equipment, then show!
28.12. Magnetic brake#
Take a string, attach a nail or paperclip, and attach the neodymium magnet to the nail or paperclip. We can now have a hand-held pendulum which will swing like any other pendulum. Take a piece of aluminum foil or better yet a sheet of copper or aluminum of say 5 x 5 cm or 8 x 4 cm whatever. Hold the magnet against the metal sheet and show that there is no attraction. Then let the pendulum swing free at first and then over the copper or aluminum sheet. It stops! Why? The moving magnet induces Eddy currents in the metal sheet. There is energy transfer from pendulum to the metal sheet.