24. Light#
In the bare classroom there is scattered light from outside, sometimes direct sunlight. There are lamps in the ceiling and there are the little flashlights on the mobile telephones of students as well as light from the telephone screens. The teacher may even have a laser pointer in his/her pocket. It should be possible to show many optics phenomena with those different sources of light.
24.1. Preliminary diagnostic questions on the propagation of light#
The nicest start of lessons on optics is in a totally dark room with at most a candlelight. But a bare classroom is unlikely to have the necessary thick black curtains. Well, improvise with a candle, let there be light! I strongly suggest you go through some very basics that rarely make it into an optics lesson and try to assess some preconceptions of your students. Why not use some multiple-choice questions like the following [@van1990student], to be answered individually.
A candle is burning in day light. The light of the candle:
stays on the candle,
comes out halfway towards you,
moves away from the candle until obstructed.
Then the same question but now at nighttime. Then follows a plenary discussion on how far light can go. If somebody with a telescope is 1 km away, can he see the candle? Does that mean that the light of the candle reaches the telescope, or is the light on the candle and the telescope looks at it?
A candle is burning during the day. The light from the candle:
stays on the candle.
comes out about halfway towards you
comes out as far as you but no farther
comes out until it hits something.
Now there is a brown out during the evening and you are using a candle. The light from the candle:
stays on the candle.
comes out about halfway towards you
comes out as far as you but no farther
comes out until it hits something.
Now there the candle is near a light bulb. The light from the light bulb:
stays on the bulb.
comes out about halfway towards you
comes out as far as you but no farther
comes out until it hits something.
Now it is evening. The light from the light bulb:
stays on the bulb.
comes out about halfway towards you
comes out as far as you but no farther
comes out until it hits something.
24.2. White light and spectra with everyday objects#
Let students use transparent ballpoint pens or other transparent glass or plastic objects to produce a spectrum. Does anybody have a pocketknife with a lens? Then recombine the colors into white. With an OHP in the room there would be many more possibilities.
24.3. Producing colors#
From the previous experiment we might have learned that anything with a wedge shape, like those cheap ballpoints with a hexagonal profile, can produce colors from white light. We can recognize such shapes everywhere, like the edge of a bathroom mirror and a prism. Look around, does anybody have clothing or shoes with glitter and colors? Any wedge shapes involved?
24.4. Color subtraction#
Anybody with transparent, colored candy wrappers? Use a flashlight or the light of a telephone and shine it through the colored paper towards the students. The original light is white, the paper wrappers subtract colors from white. A red paper wrapper subtracts blue and green and lets red go through. A blue paper wrapper subtracts green and red and lets blue go through. If you have more candy wrappers and more lamps you can add colors together again.
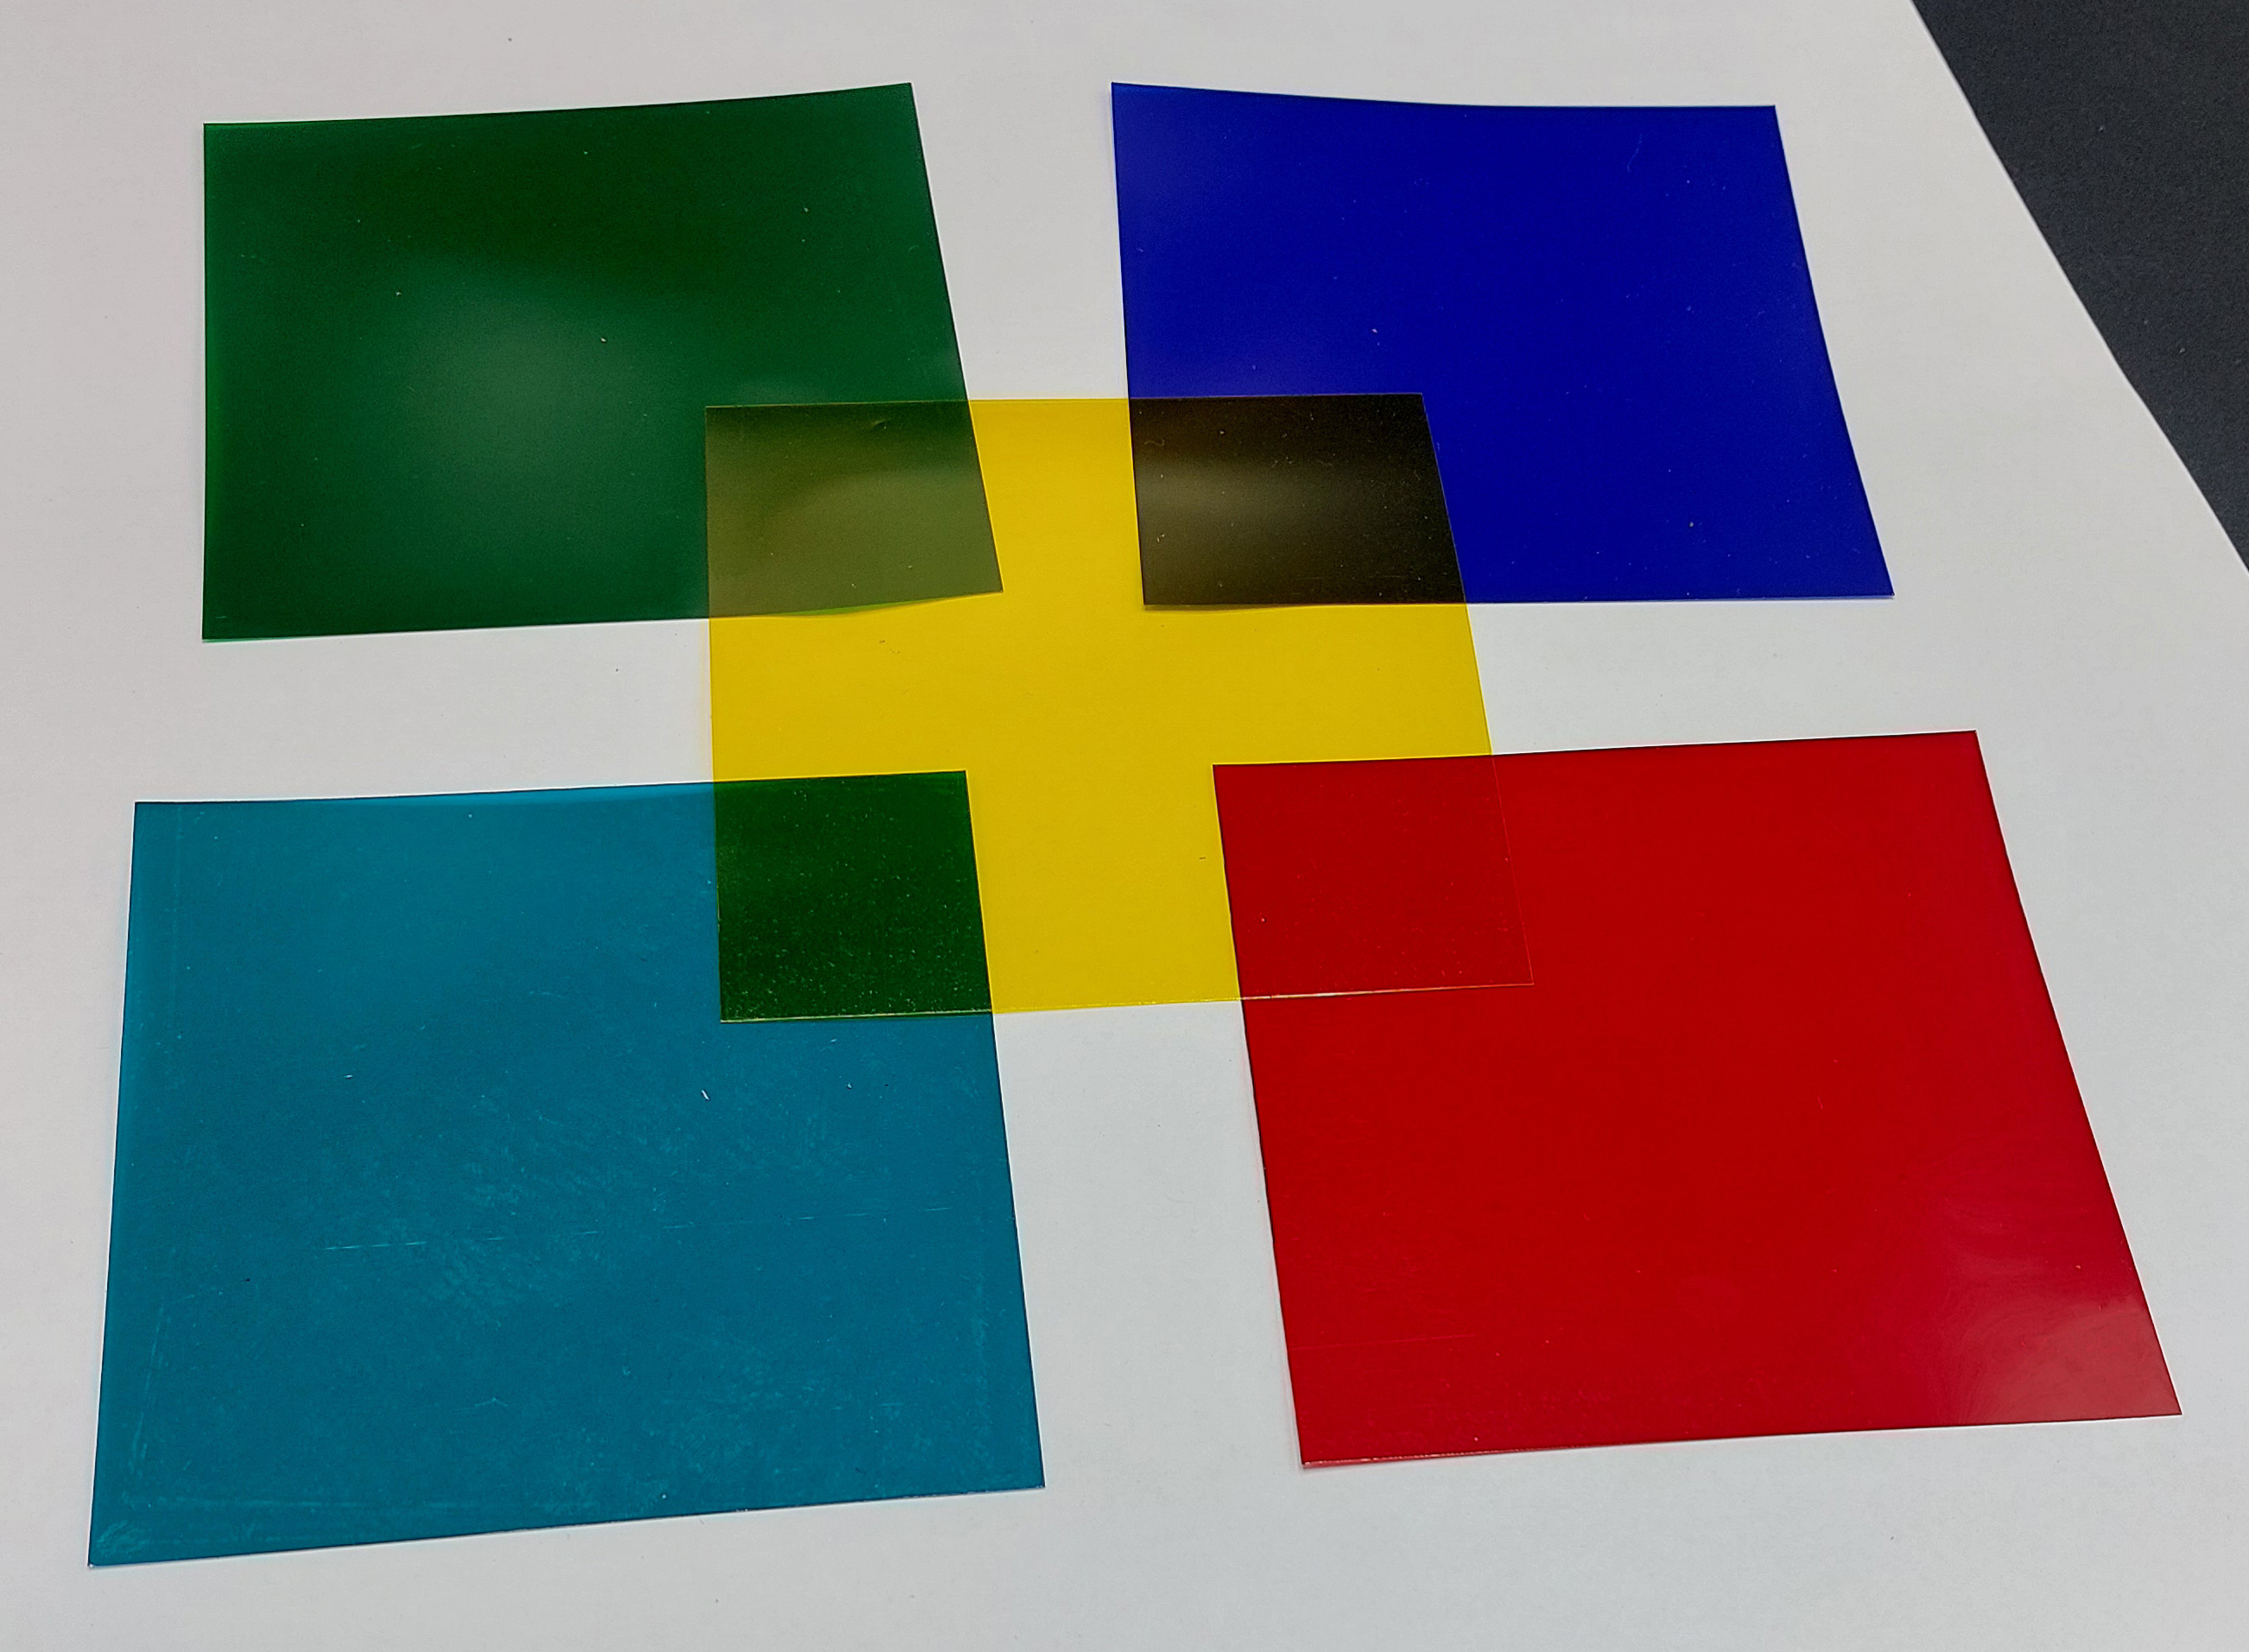
Fig. 24.1 Put various colored transparent papers on top of each other.#
24.5. Color addition#
Perhaps you have a Newton color disk on top of a spinning top. By spinning colors you can add them up to a white appearance. Or use a string through one hole in the center and one off center to make the disk spin. Of course PhET has a very nice simulation for color addition which shows how with primary colors all other colors can be produced.
24.6. Reflection#
There must be students in class with a mirror in their bag. Other reflecting objects might be windows, metals, spoons, etc. One can easily imagine many demonstrations. A spectacular demo is to tell your class that your whole body will be visible in any mirror as long as you increase your distance to the mirror. Then you disprove, using a mirror taken from outside the classroom, or borrowing a mirror from one of the girls. Beware of convex and concave mirrors for this particular demo, the mirror should be flat.
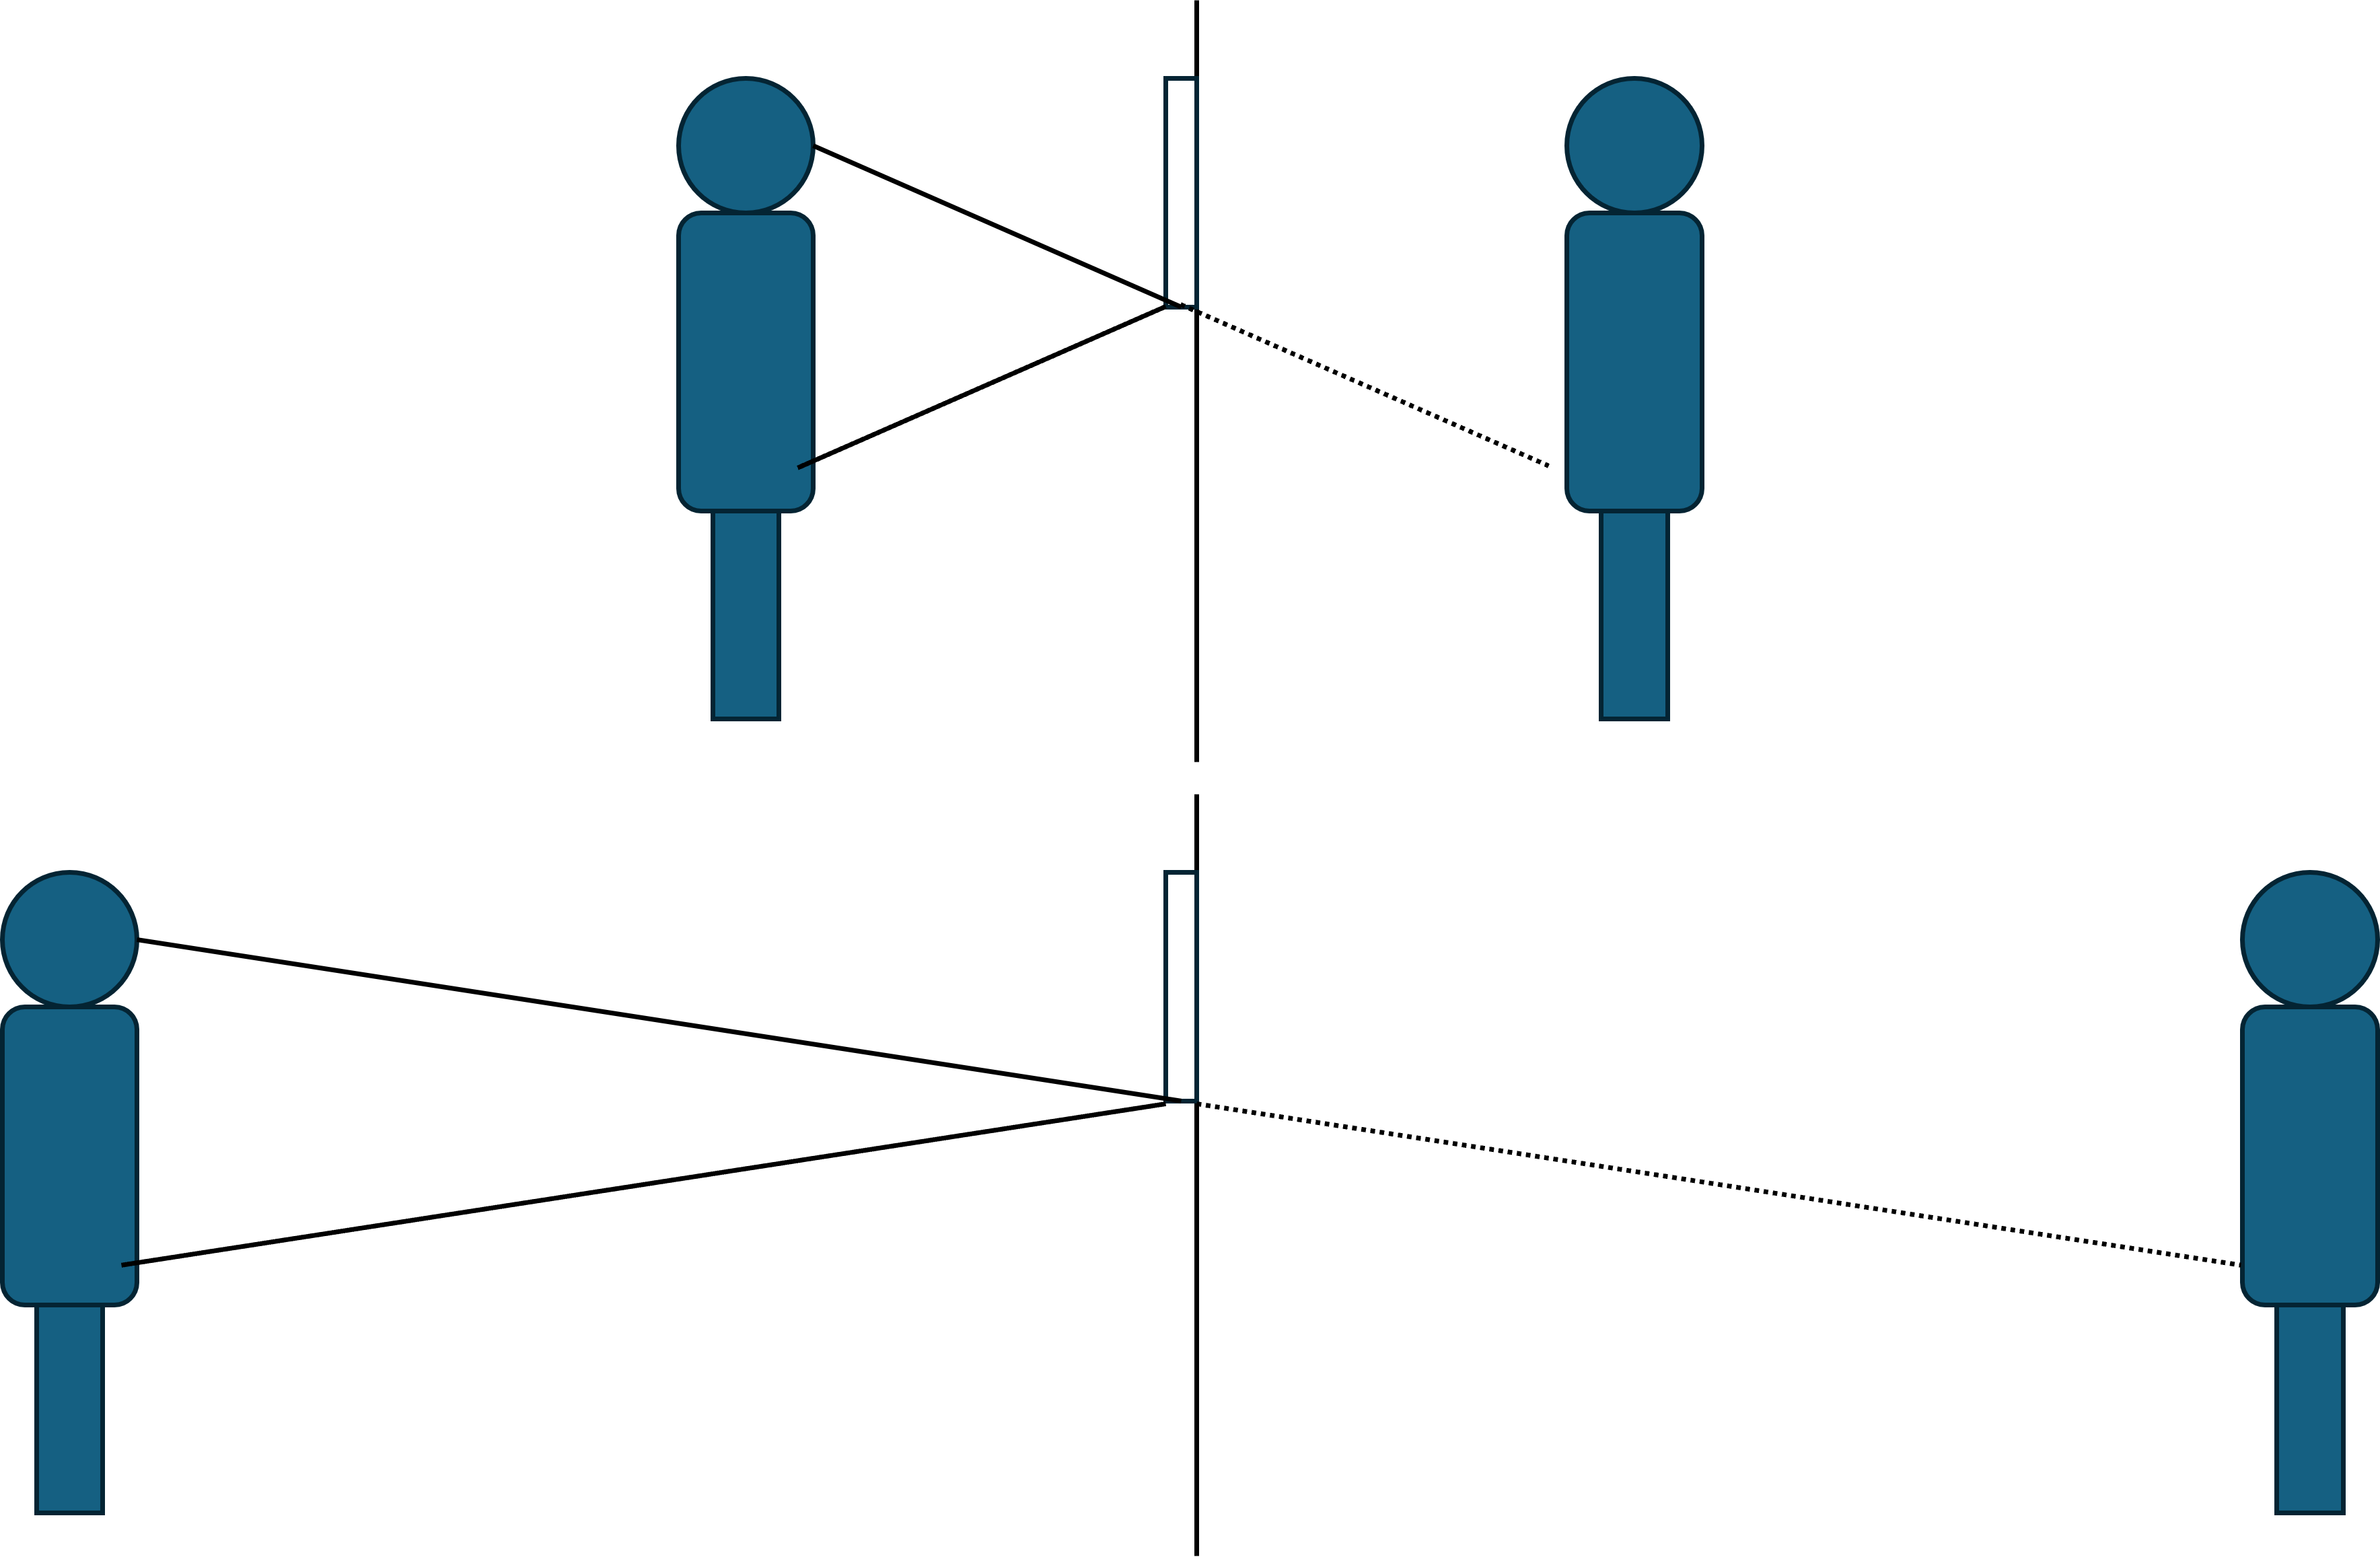
Fig. 24.2 Does more body become visible when moving away from the mirror?#
24.7. Visualization of Snell’s Reflection in three dimensions#
We rarely demonstrate what it means that incident and reflected (or refracted) light rays should be in one plane. Take three meter-sticks, or rulers, or pieces of pipe, or broom sticks, or pencils (too small). One meter-stick becomes the normal, the other two become incident and reflected or refracted rays respectively. Emphasize their orientation in one plane and show examples of orientations, which are not possible (not in one plane). Alternatively, you could ask students in their seats to demonstrate Snell’s law to you using ballpoints and pencils. You can easily check 10 students in 1 minute. If you have a laser pointer and a small mirror, then of course you could easily confirm this by putting the mirror flat on the table and shining the laser on it.
24.8. Snell’s reflection Law with a laser pointer#
If there is a laser pointer in the room, then get a mirror from one of the girls, put it on the table, and show that the incoming and reflected rays are in one plane with the normal. Watch out that you get a flat mirror and not a concave or convex one.
24.9. Snell’s reflection Law: constructing light rays with pins#
If you do have pins, then you can use a pencil standing straight up and construct light rays going towards and reflected away from a vertical mirror from several viewpoints and by extension find the location of the virtual image. See a nice series of simple and useful experiments in [].
24.10. Refraction 1 pencil slanted in glass of water#
Walk around with pencil slanted in a glass of water, or better, in rectangular container.
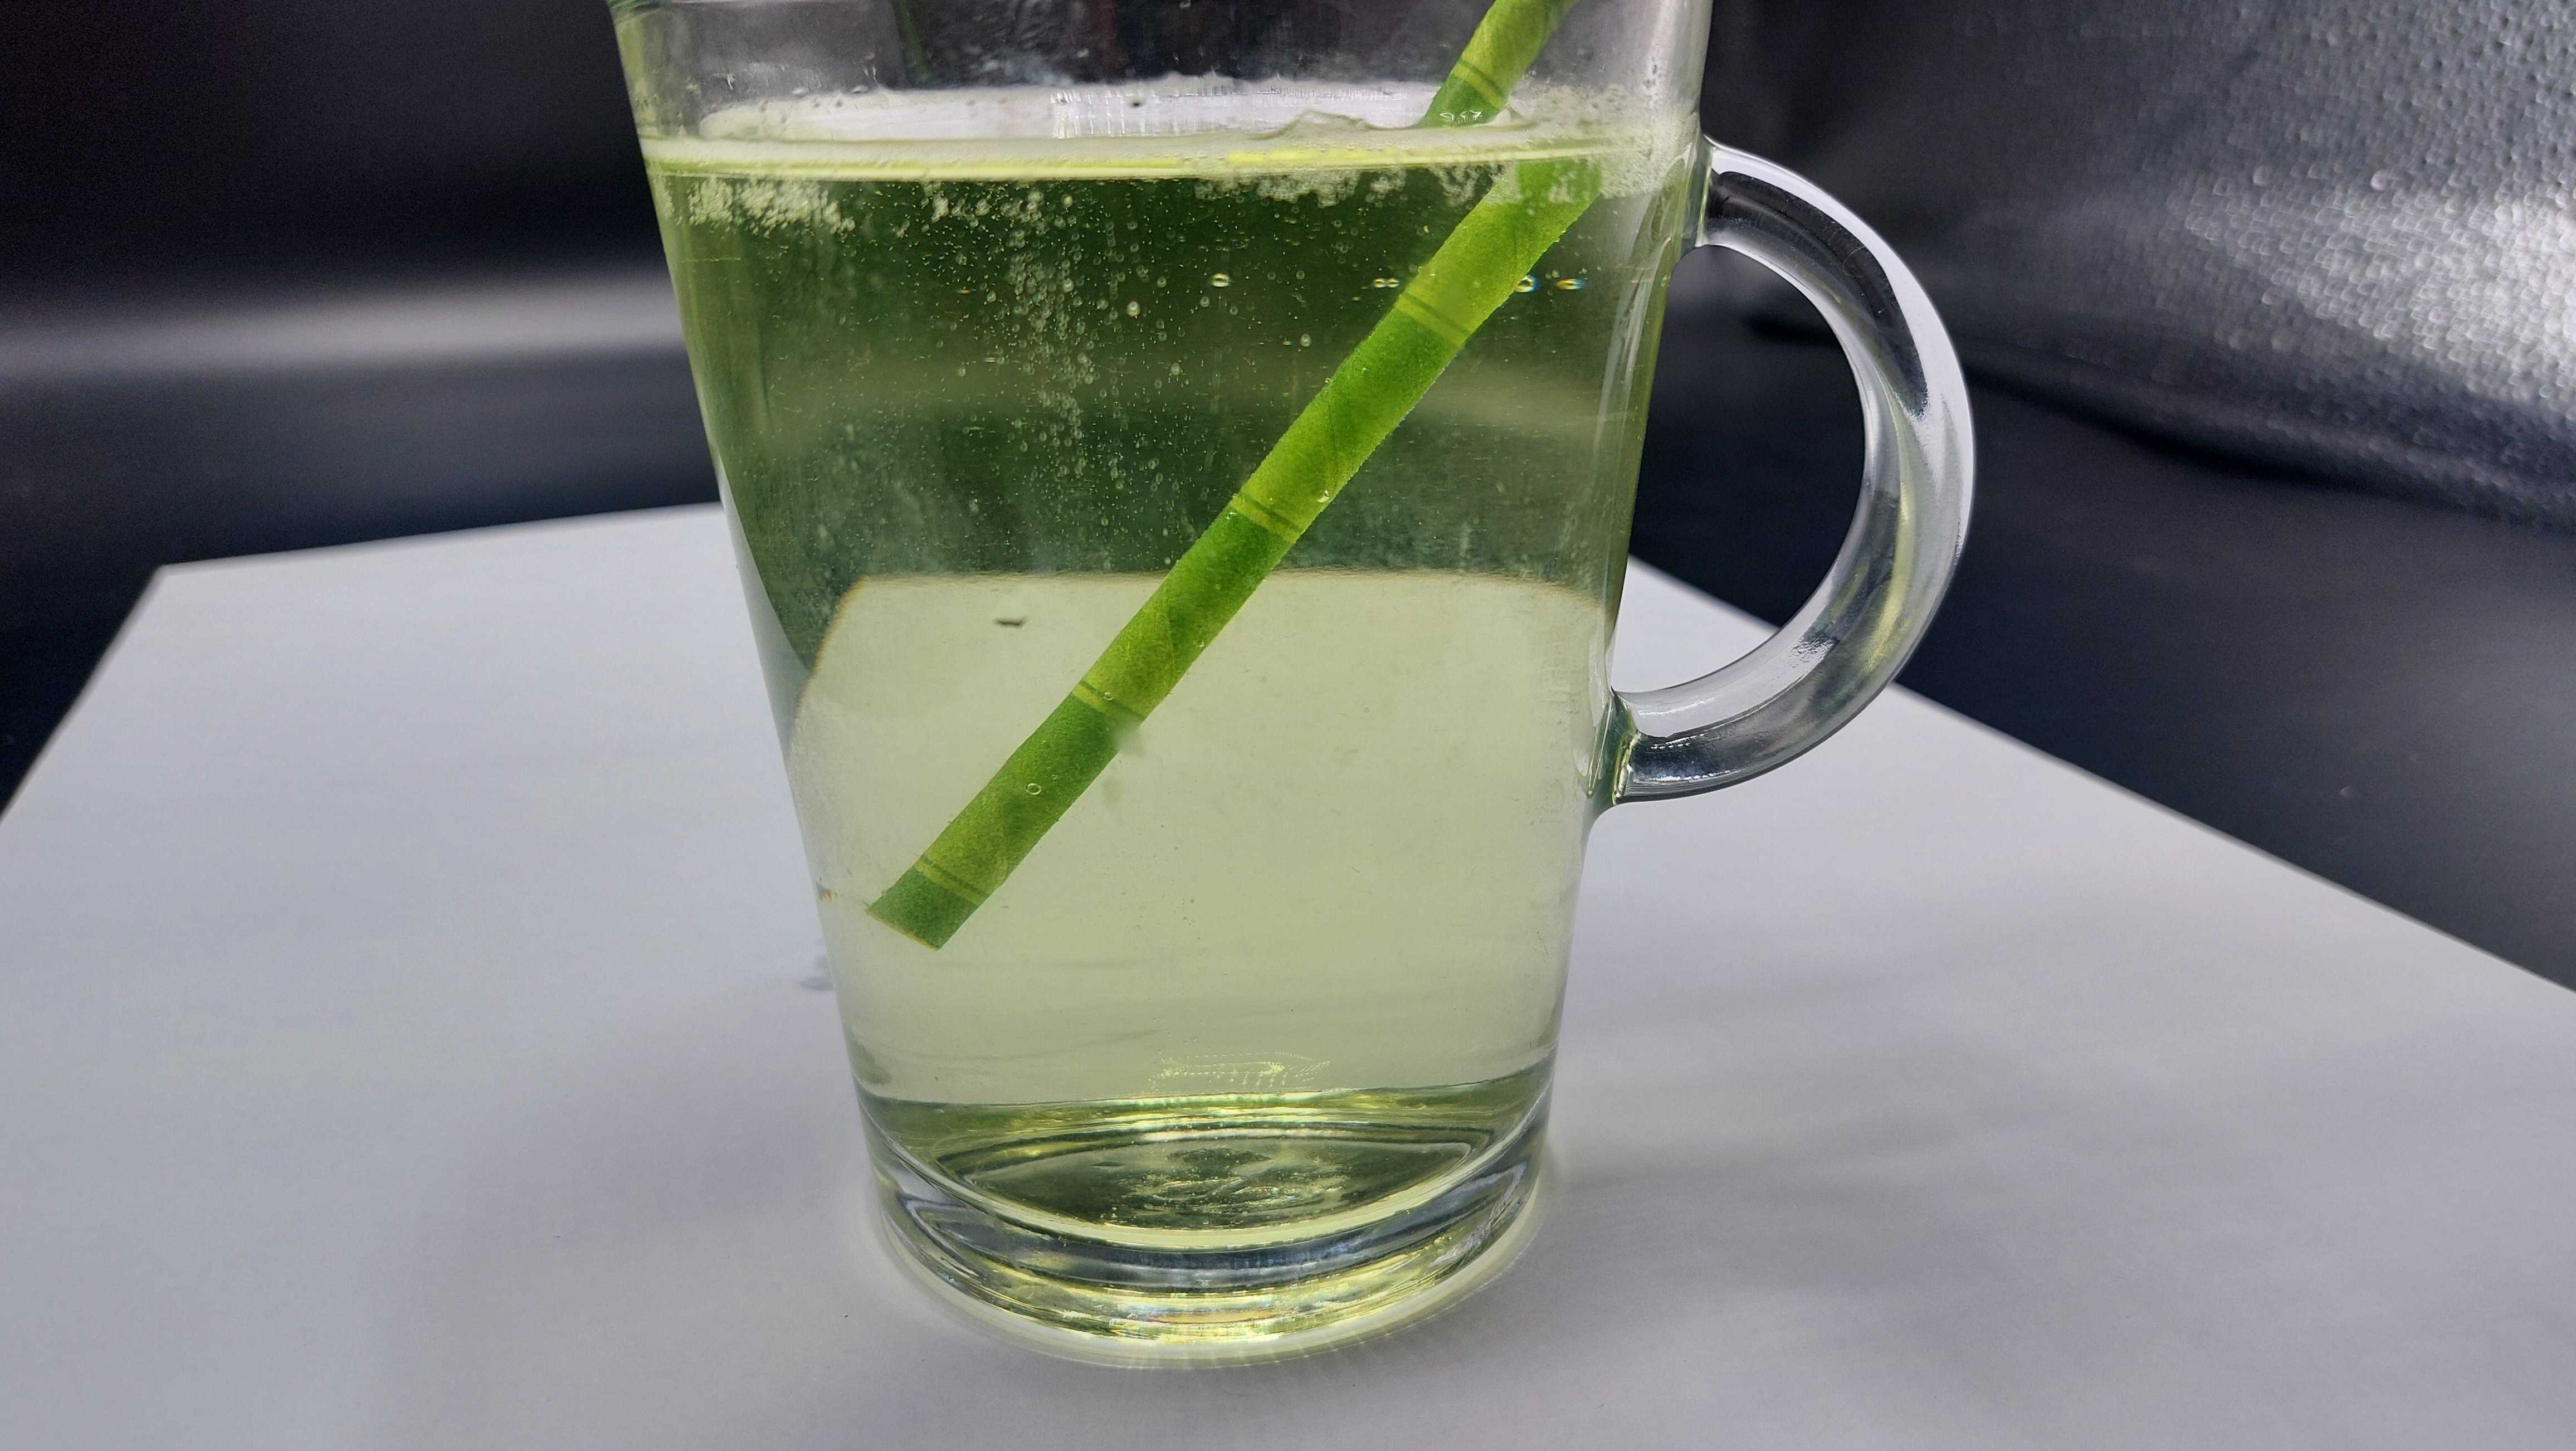
Fig. 24.3 A broken straw?#
24.11. Refraction 2 pencil straight up in glass of water#
Stick your finger or a pencil straight up in a (round) glass of water. Move through the classroom while moving your finger forward and backward. No need for talking, many students seem surprised at this everyday observation of a “swollen” finger. Explaining can be quick by stating that the water in a glass acts as a lens. A better explanation with refraction of light rays might take 10 minutes or could be given as a task for seat or home work.
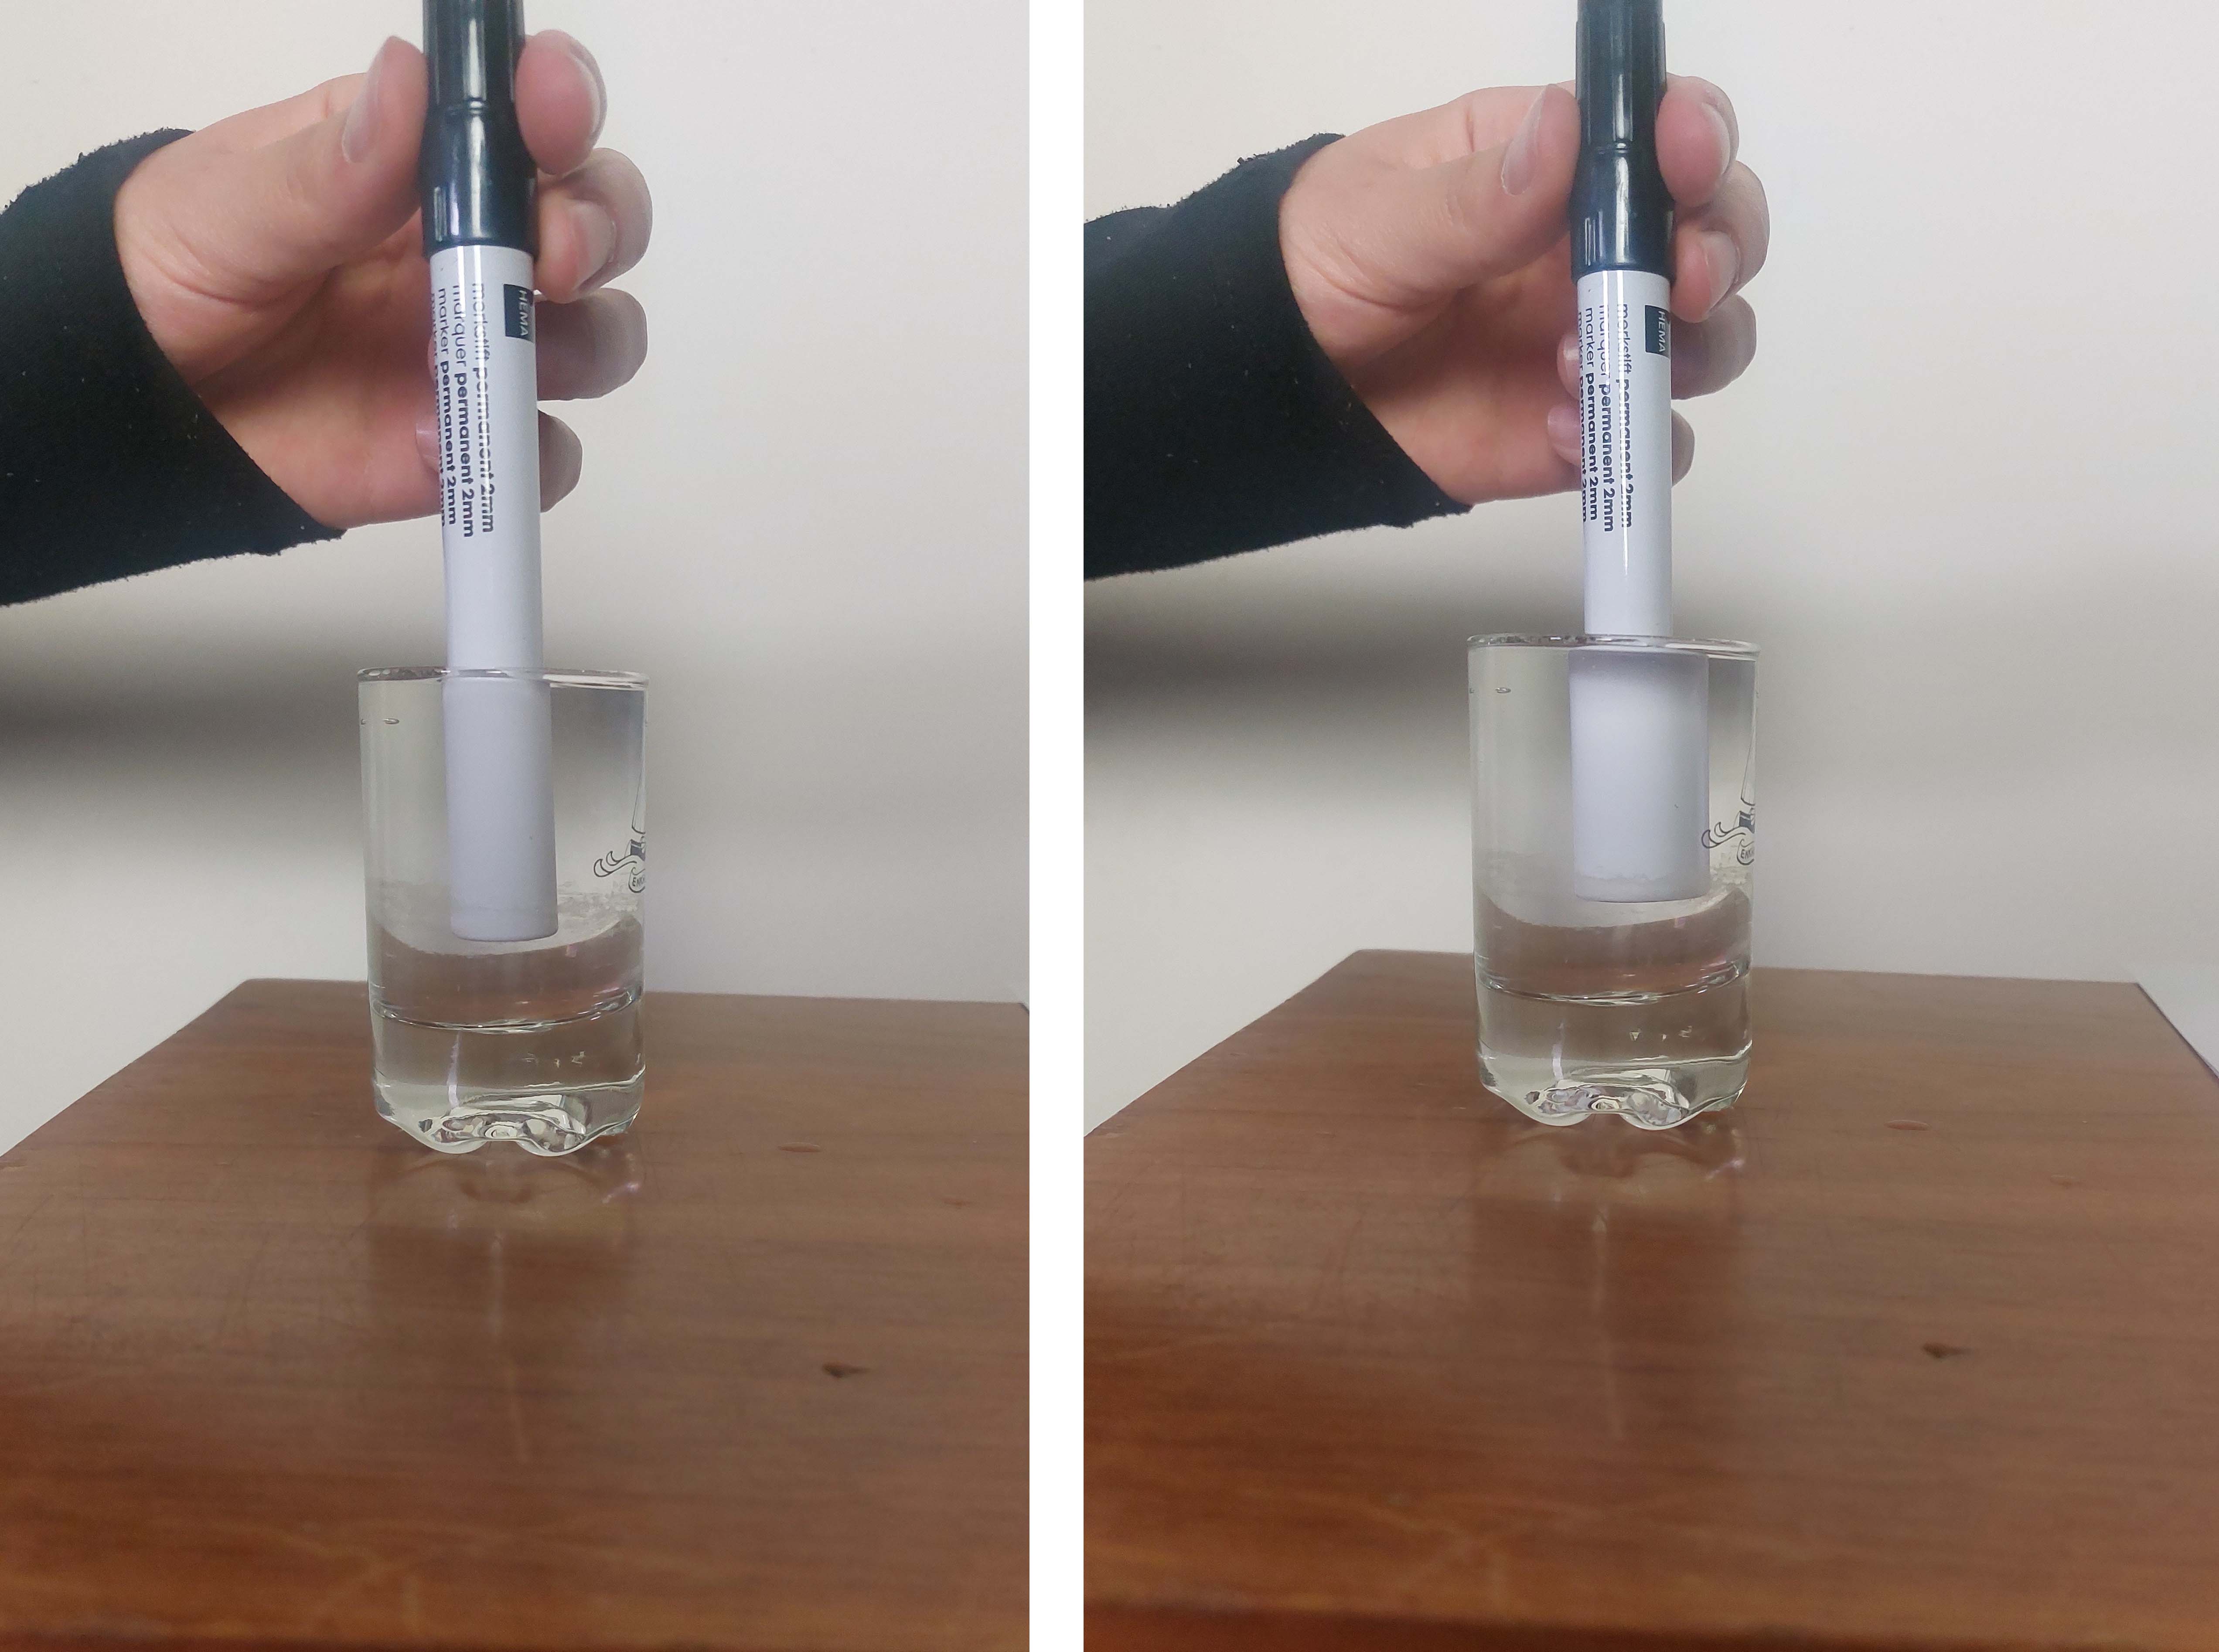
Fig. 24.4 Move the pencil back and forth and describe what you see#
24.12. Refraction 3 arrows seen through air and through a glass of water#
(Czech contribution to Physics on Stage, []) Draw parallel arrows on a piece of paper (the object), hold that behind a glass of water half-filled such that some arrows are seen through the air and other arrows through the water. If the object distance is farther than the focal length, then the arrows are reversed Fig. 24.5.
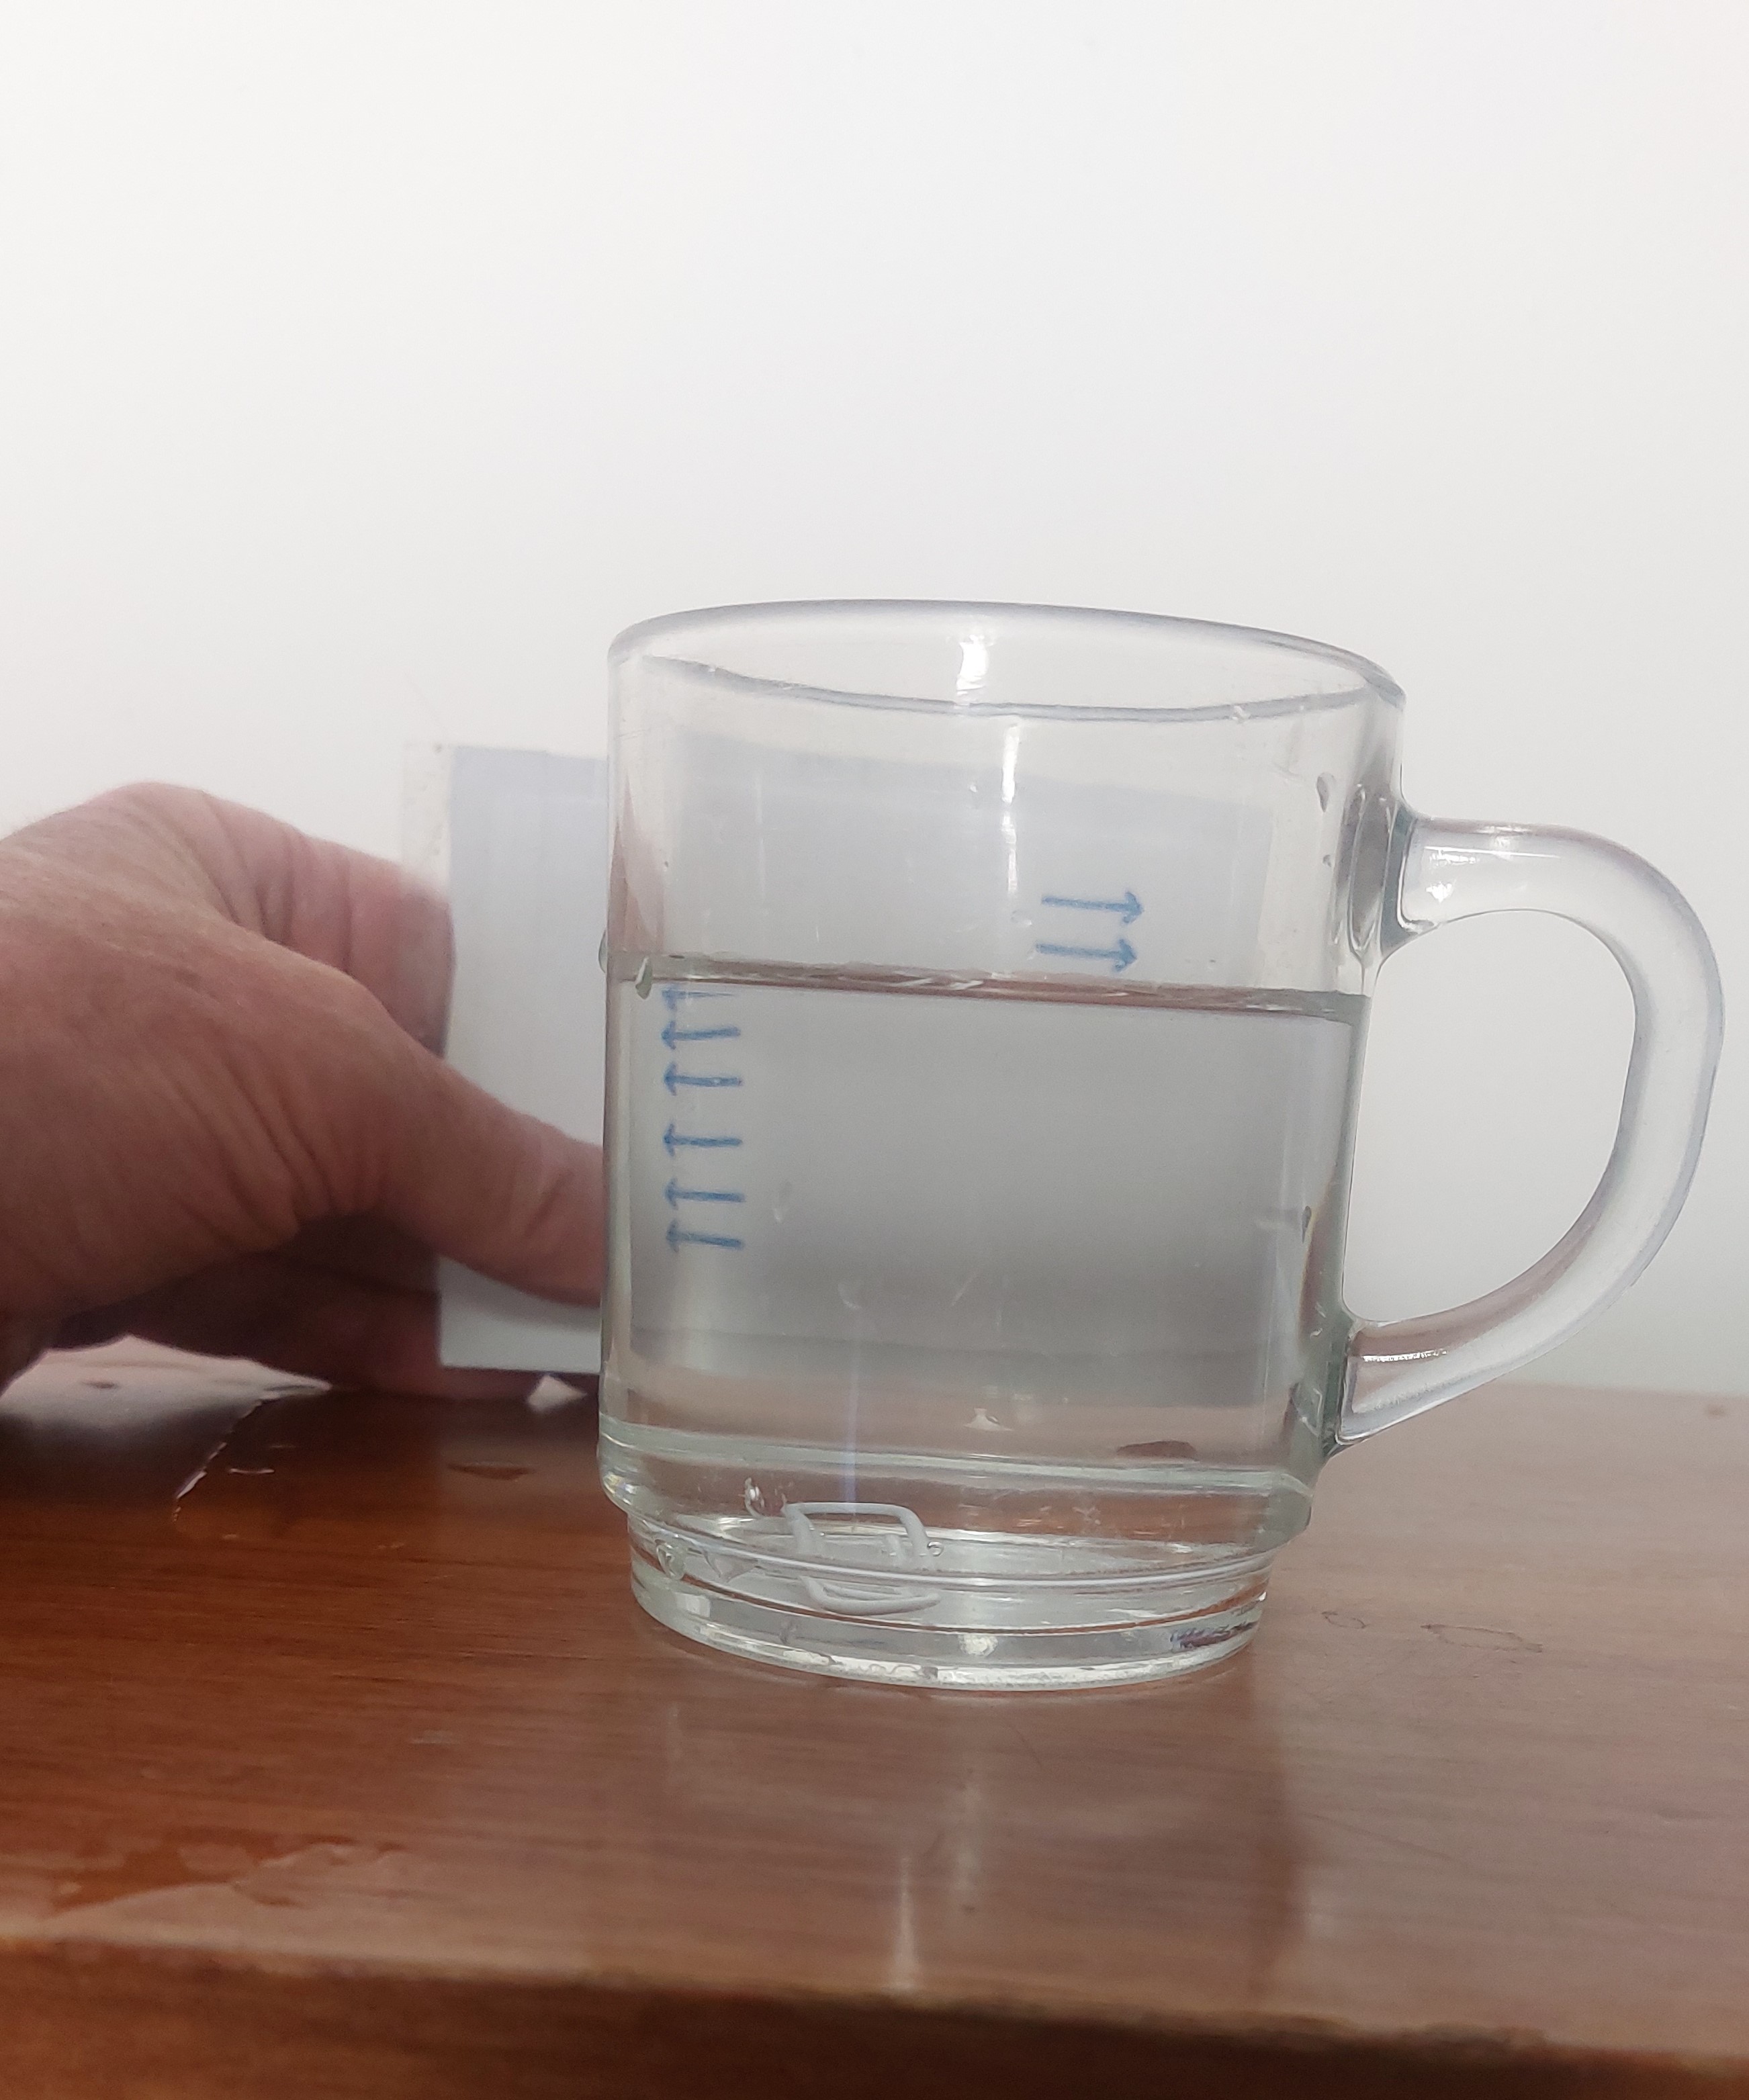
Fig. 24.5 Do the arrows point in the same direction?#
24.13. Refraction 4: Physics is Fun in the swimming pool#
Ask students to draw the light ray diagram requested in Fig. 24.6. Walk around to identify frequent errors. Discuss, and then ask students how they could create an analog situation with a Lego mini-doll or a pencil and follow their instructions to demonstrate.

Fig. 24.6 Fun physics in the pool#
24.14. Bright versus dark background#
Switch off the classroom lights. The teacher or a student stands against the wall opposite of the windows. The face is clearly visible as more light is reflected from the face than from the background. Then the teacher or student stands in front of the windows with the face towards the class. Now the face looks dark and unclear as the reflected light from the face is very little compared to the light coming through the windows. Then turn on the lights in the classroom and the face is better visible again. The same effect is visible in Fig. 24.7.
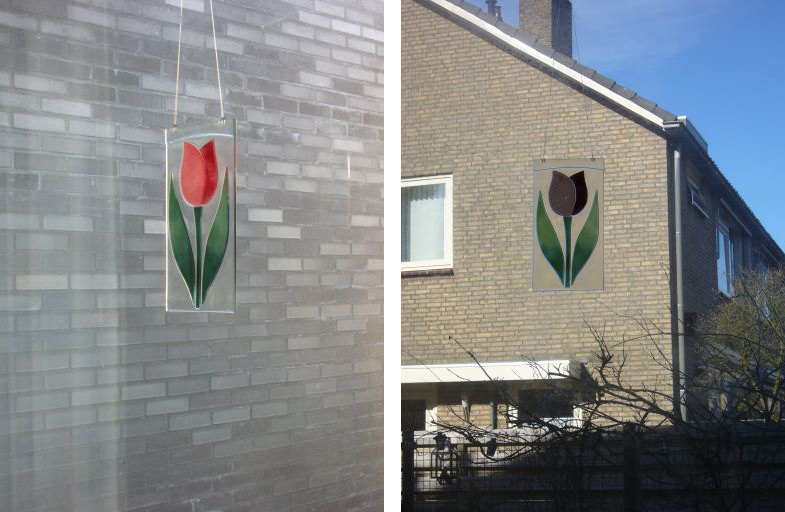
Fig. 24.7 Has the tulip changed color?#
24.15. Pupil, diaphragm#
Arrange students in pairs. They are to observe each other’s pupil contraction. Make the classroom dark or let students cover their eyes. Then put on the lights. Can students see each other’s pupils get smaller? Repeat one time for a better view the second time around.
24.16. Reflection and transmission 1#
Take a piece of paper, wet it a bit in the middle with water, oil, or saliva, then hold it in front of the window (or a lamp). The wet part appears light, it transmits. Then put the paper on the table where it reflects light. Now the wet spot looks dark, because of the transmission, it reflects less than dry paper. Students can do this in their seats using their saliva or whatever wet stuff is available Fig. 24.8.

Fig. 24.8 The wet part appears light, it transmits.#
24.17. Reflection and transmission 2#
(in winter) Do students have bicycle LEDs in their pockets or bags? Darken the room. Take two LEDs. Hold the paper with the oil stain in between and look for a point where the reflection and transmission are the same. You can even make this into a light intensity meter. You can compare the intensity of lamps with different power. See also exploratorium
24.18. Accommodation of the eye#
Let your students hold a pen or pencil or finger near the eye. Nearer and nearer …. the background will become unclear/unfocussed. When our eyes focus on the background, then the pen/pencil will appear unfocussed. The lens of the eye adjusts to the distance (up to a point). This is clear evidence that the lens of the eye can focus and it has to change shape and thus focal length to do so. We call this accommodation.
24.19. Depth of field#
The previous experiment also shows the camera concept of depth of field. But students can also try with their own camera’s. Let them focus on something farther away and then let them move their index finger back-and-forth in front of the lens. See how the background is sharp and the finger in the foreground is not. Also try with written words in the foreground and background. The camera’s nowadays have a surprising depth of field. Perhaps have some example photographs ready on the beamer in your classroom.
24.20. Lenses#
Did any student bring a lens, perhaps with a pocket knife? Or bring some lenses of your own. Use the window as object (or a bicycle LED) and a piece of paper or the wall opposite the windows as screen. See whether the image is upright or upside down, etc.
24.21. Narrow slit diffraction or refraction?#
Look at the lights in the ceiling, close your eyes to a narrow slit, the beam widens perpendicular to the direction of the slit. The effect is better when using an incandescent light bulb up front, preferably with transparent glass and a straight filament. Could Huygens have seen this evidence of diffraction in the 17\(^{th}\) century? Well, try tonight with a candle. With some lights even color fringes are clearly visible. However, the famous [] explained the stripes of light through differential refraction by little dykes of liquid along the edge of the eyelid (part 1, p122 of the original Dutch edition). So no refraction after all. But now pay attention to light falling through your eyelashes. Do you see colors? Now isn’t that diffraction by hairs?
24.22. Mouche volante#
There is more to see in the eye itself. Look into the beautiful blue sky or another even light background like a white classroom ceiling and you may see wiry structures floating in your eye. See http://en.wikipedia.org/wiki/entoptic_phenomenon for a better description and some other phenomena in our eyes. While turning your head, these wiry structures tend to stay behind: inertia and proof that these are structures floating in the liquid inside the eyes!
24.23. Parallax#
Have students close their right eye and stick up their pen at arm’s length such that it is in line with a mark on the black board. Have them then close the right eye and open the left one. The pen is no longer in line with the mark on the board as we look at it from just a different angle. That is parallax. The farther the distance from pen to the mark on the board, the smaller the difference. So parallax can be used for distance measurement. See Fig. 24.9 for the apparent shift of the pen against a background.
Fig. 24.9 The pen at arms’ length from the camera (the eye), is exactly aligned with the edge of the batik. When the camera has been shifted 5 cm to the left which is the distance between the eyes. The pen did not shift. The closer the pen from the batik, the smaller the apparent shift in position.#
24.24. Dominance of one eye#
With two eyes open keep the pen at arm’s length and aligned with a mark on the board, focus the eyes on the board. Now close the left eye, then open left and close the right eye. If the pen shifts quite a bit (compared to two eyes open) when the right eye is closed, then the right eye is the dominant one. If that does not happen for the right eye, but for the left eye, then the left eye is dominant.
24.25. Seeing depth 1#
Two eyes are better than one, especially in seeing depth and estimating distances. Let students take a pen or pencil in the left hand and another one in the right hand Fig. 24.10. Move both hands around a bit and then let all student close one eye and move the pens toward one another until the tips touch. With one eye closed that is difficult, with two eyes open it is easy. The experiment can also be done with the two index fingers, but with pens it is more dramatic.
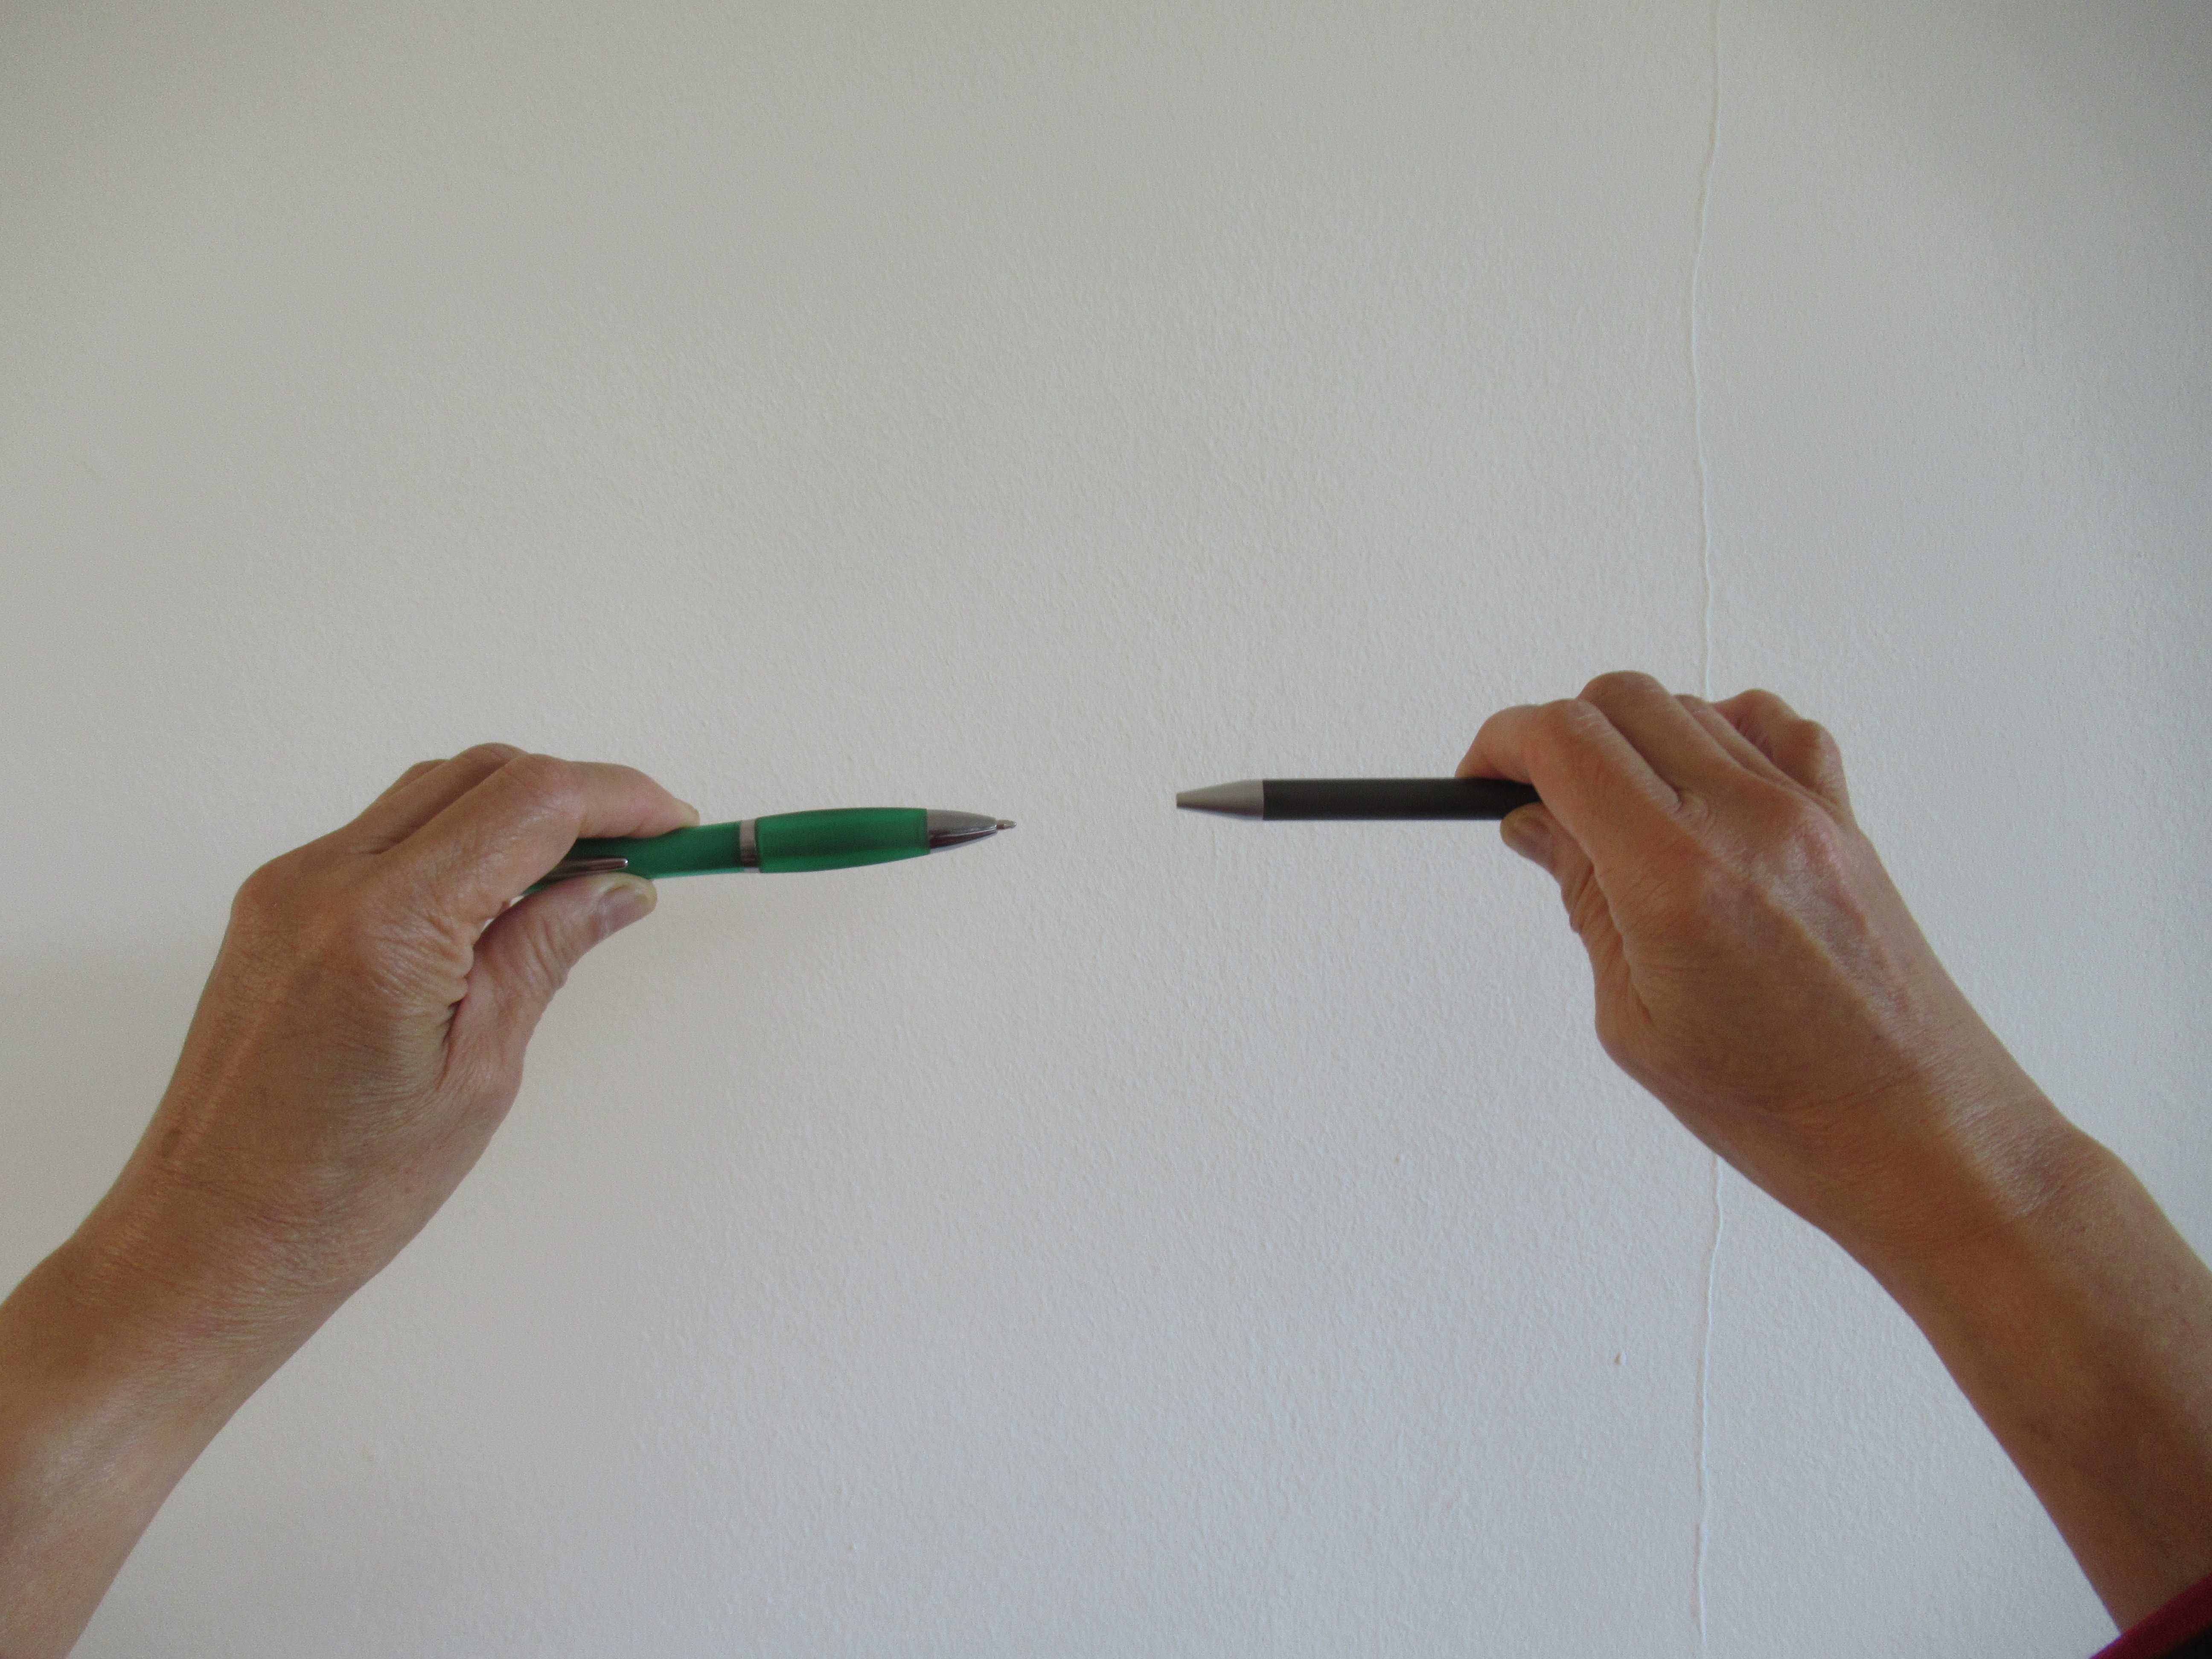
Fig. 24.10 Estimating distance with one or two eyes.#
24.26. Seeing depth 2#
This demonstration can be done as a teacher demonstration with a student in front of the class but can also be done as a semi-lab activity with student pairs where in each group one student is subject and the other is experimenter. Collect coins or buttons or paper clips or other small objects and a beaker (or draw a circle on paper). The beaker or circle should be about 60 cm from the subject. The subject closes one eye. The teacher or student experimenter holds a coin or button about 50 cm above the table and moves the hand slowly. The subject says “drop” when (s)he thinks the object is exactly above the target and then see whether the object falls inside the beaker or circle. Compare greater and smaller distances and one or two eyes. An alternative with more clear reports is to draw concentric circles with a radius of 1, 2, and 5 cm. The subject is located 1,5 m from the circles with one eye closed. The experimenter holds a marker with the tip downward. The subject instructs the experimenter to move the marker forward/backward or left/right until (s)he thinks the marker is above target. Then drop. The pattern of dots constitutes the report. Use different color markers for different conditions such as one or two eyes closed or different distances, or different observers.
24.27. Blind spot#
Almost any textbook has instructions for how to find the blind spot of the eye. Have students draw an X (left) and a big dot (right) about 6 cm apart in their notebook. Let them close the left eye and focus the right eye on the X. Then move the notebook towards the eye. At a certain point the dot will not be visible. That is when the light from the dot falls on the spot where the optic nerve leaves the eye. For detailed instructions this workresearch.
24.28. Center and sides of retina, peripheral vision#
Think of something to illustrate the different nature of eye cells in the center and at the periphery of the retina. The periphery is much more sensitive to detecting movement, protecting eyes against insects, etc. Students will volunteer their stories.
24.29. Optical illusions#
Photocopy the famous pictures of parallel lines which do not seem parallel, Escher’s art work, Gestalt pictures, etc. onto transparencies and that are ten little demo’s right there. Or google on optical illusions and put them on your classroom beamer. See for instance optics4kids.
24.30. Diffraction#
If you or your classroom has a laser pointer, then possibilities for experiments are endless: hairs, holes, slits, reflection, refraction, diffraction, scattering from dust.
24.31. OHP#
If there is an OHP in the room, then 10 or 20 short demos could easily be added to this list. Think of the typical blue-purple or red-orange fringes around shadows of objects between lens and screen. One can create similar fringes by looking at windows or door openings through a big prism containing water. When the prism’s triangle is pointing up, the red-yellow occurs above shades and the bluish-purple below shades. Turning the prism upside down gives the opposite effect. This is the key to explanation.
24.32. Minnaert#
Marcel Minnaert was a well-known Flemish - Dutch astronomer who wrote a famous series of three books on physics in the environment. His book on light and color in the landscape was translated in English and appeared in 1954 []. He describes many simple experiments that he conducted with almost no tools and often surprising results. Check your knowledge of Physics in the environment against Minnaert’s observations!
24.33. Other#
See [] for simple optics experiments with a laser or laser pointer.