
3.4. Version control with Git#
Imagine working on a piece of code for a few days or weeks, modifying it over time, only to realize after a while that the code you wrote and deleted on the first day was actually the way to go. Wish you could go back and retrieve that code, right?
In these situations, a habit of working with a version control program comes to your rescue! Git is the most popular software for version control - it allows you to manage the changes you make in your code. Regularly saving your code with Git is extremely useful, as it allows you to track changes, that is, to see all versions that you stored to Git as you were working. In practice, that means that you can trace back everything you deleted and added throughout your work on the code.
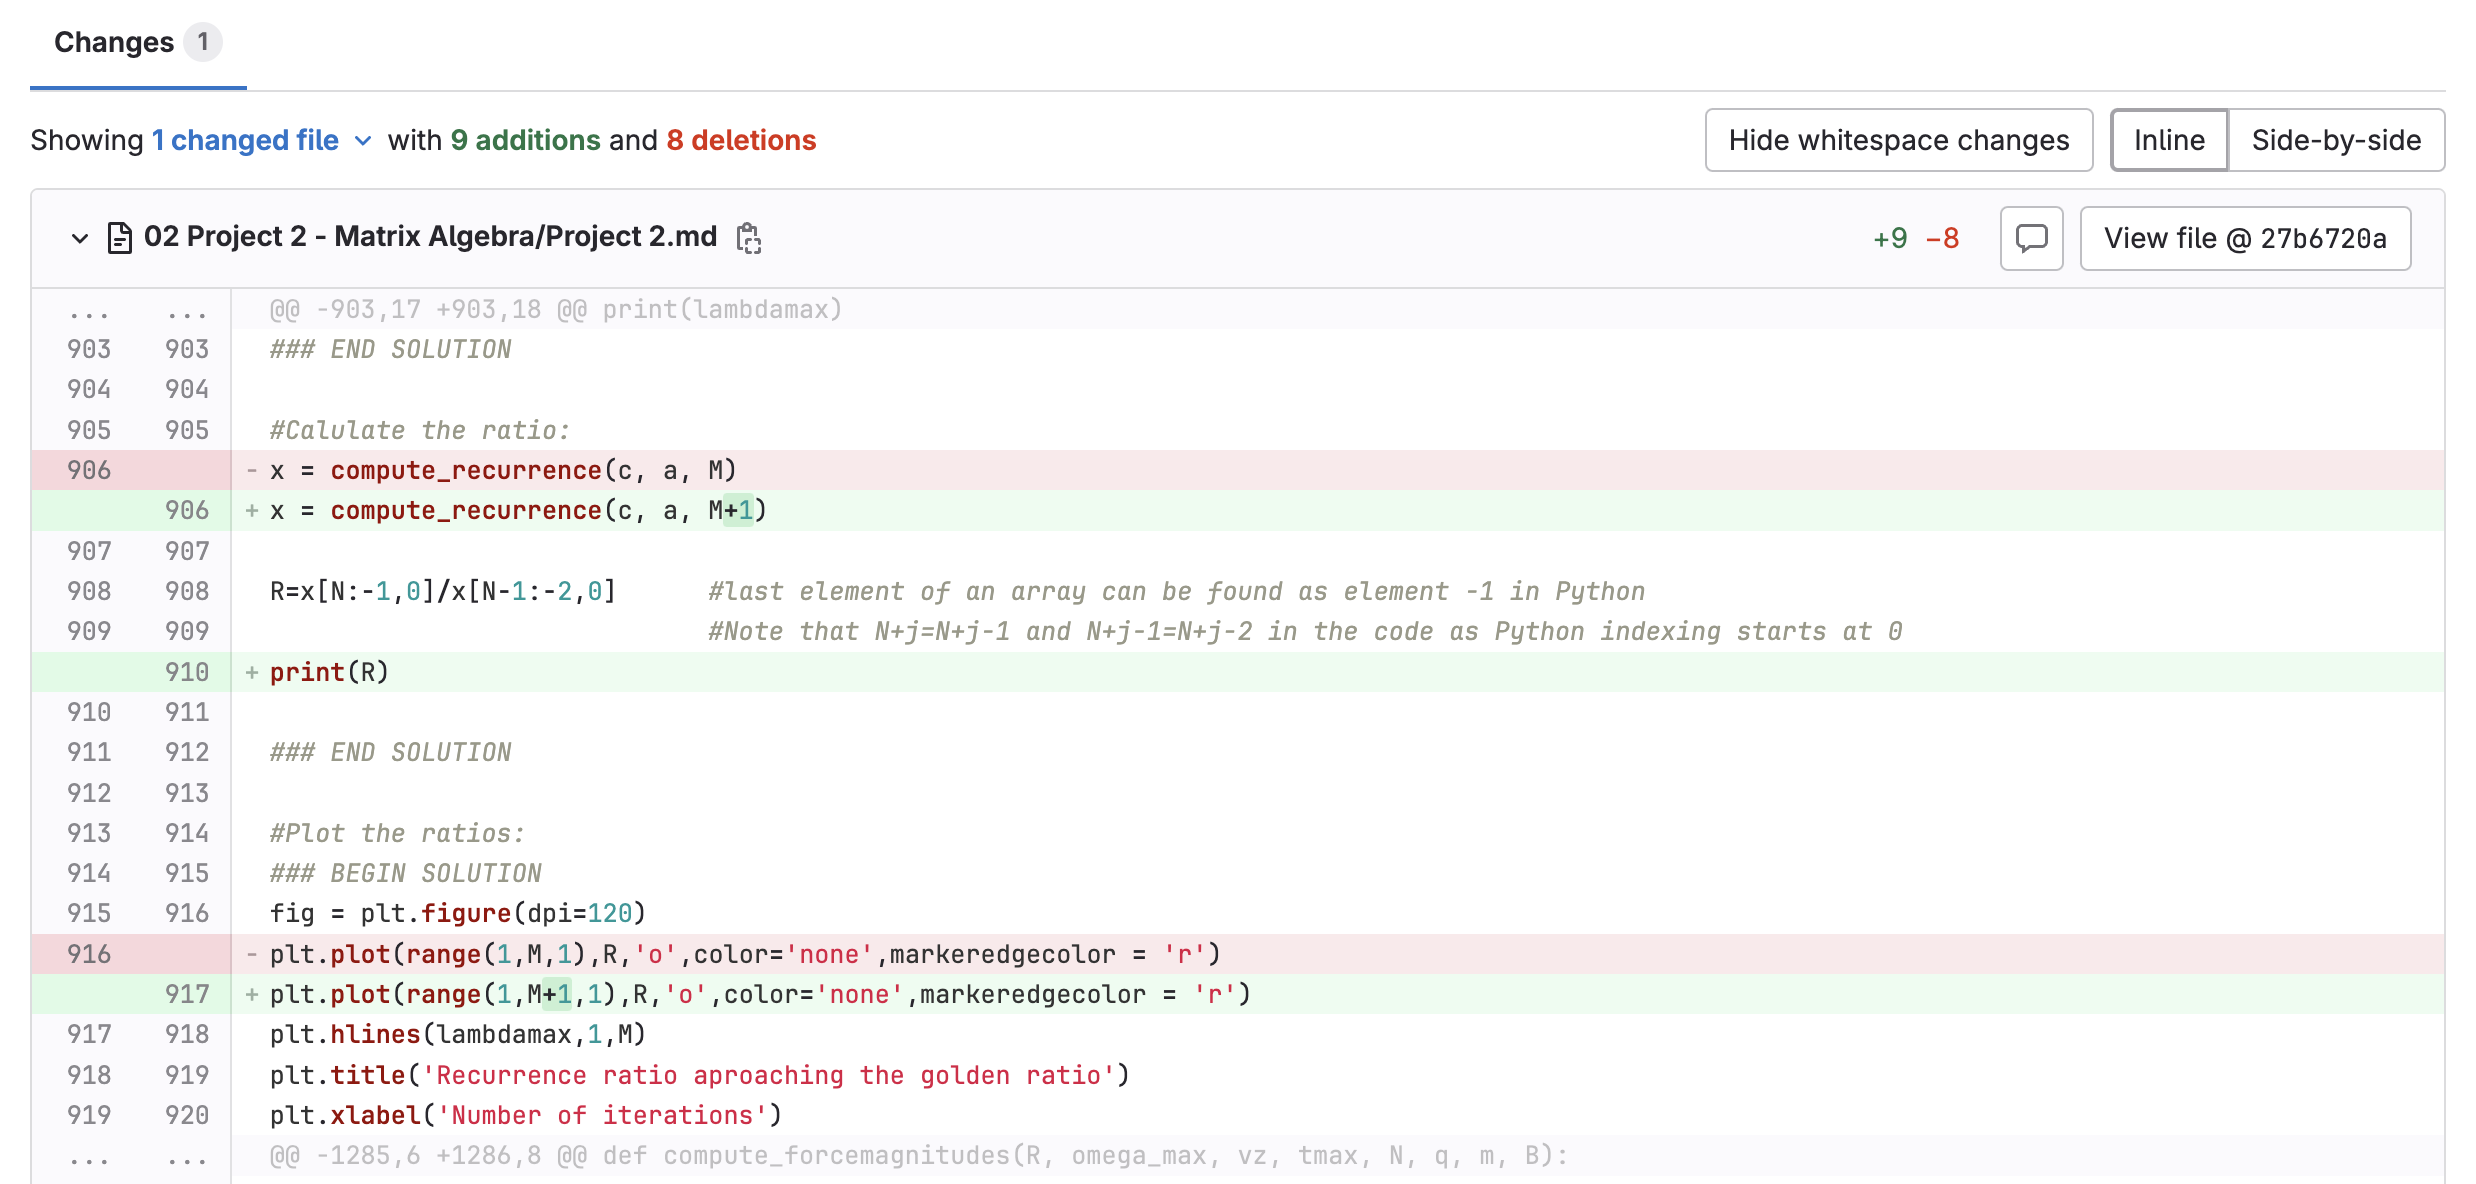
Fig. 3.5 Python code with tracked changes (additions in green and deletions in red).#
We recommend you to regularly use Git both while learning with this book as well as in all your future programming. It’s one of the good practices of coding that is nice to make a habit from the get-go.
3.4.1. Git in a nutshell#
You will work only with the basics of Git at this level. These will allow you to save your code and track its version, as well as to retrieve code from a remote repository. Let’s get acquainted with the basic functioning of Git and the appropriate terminology.
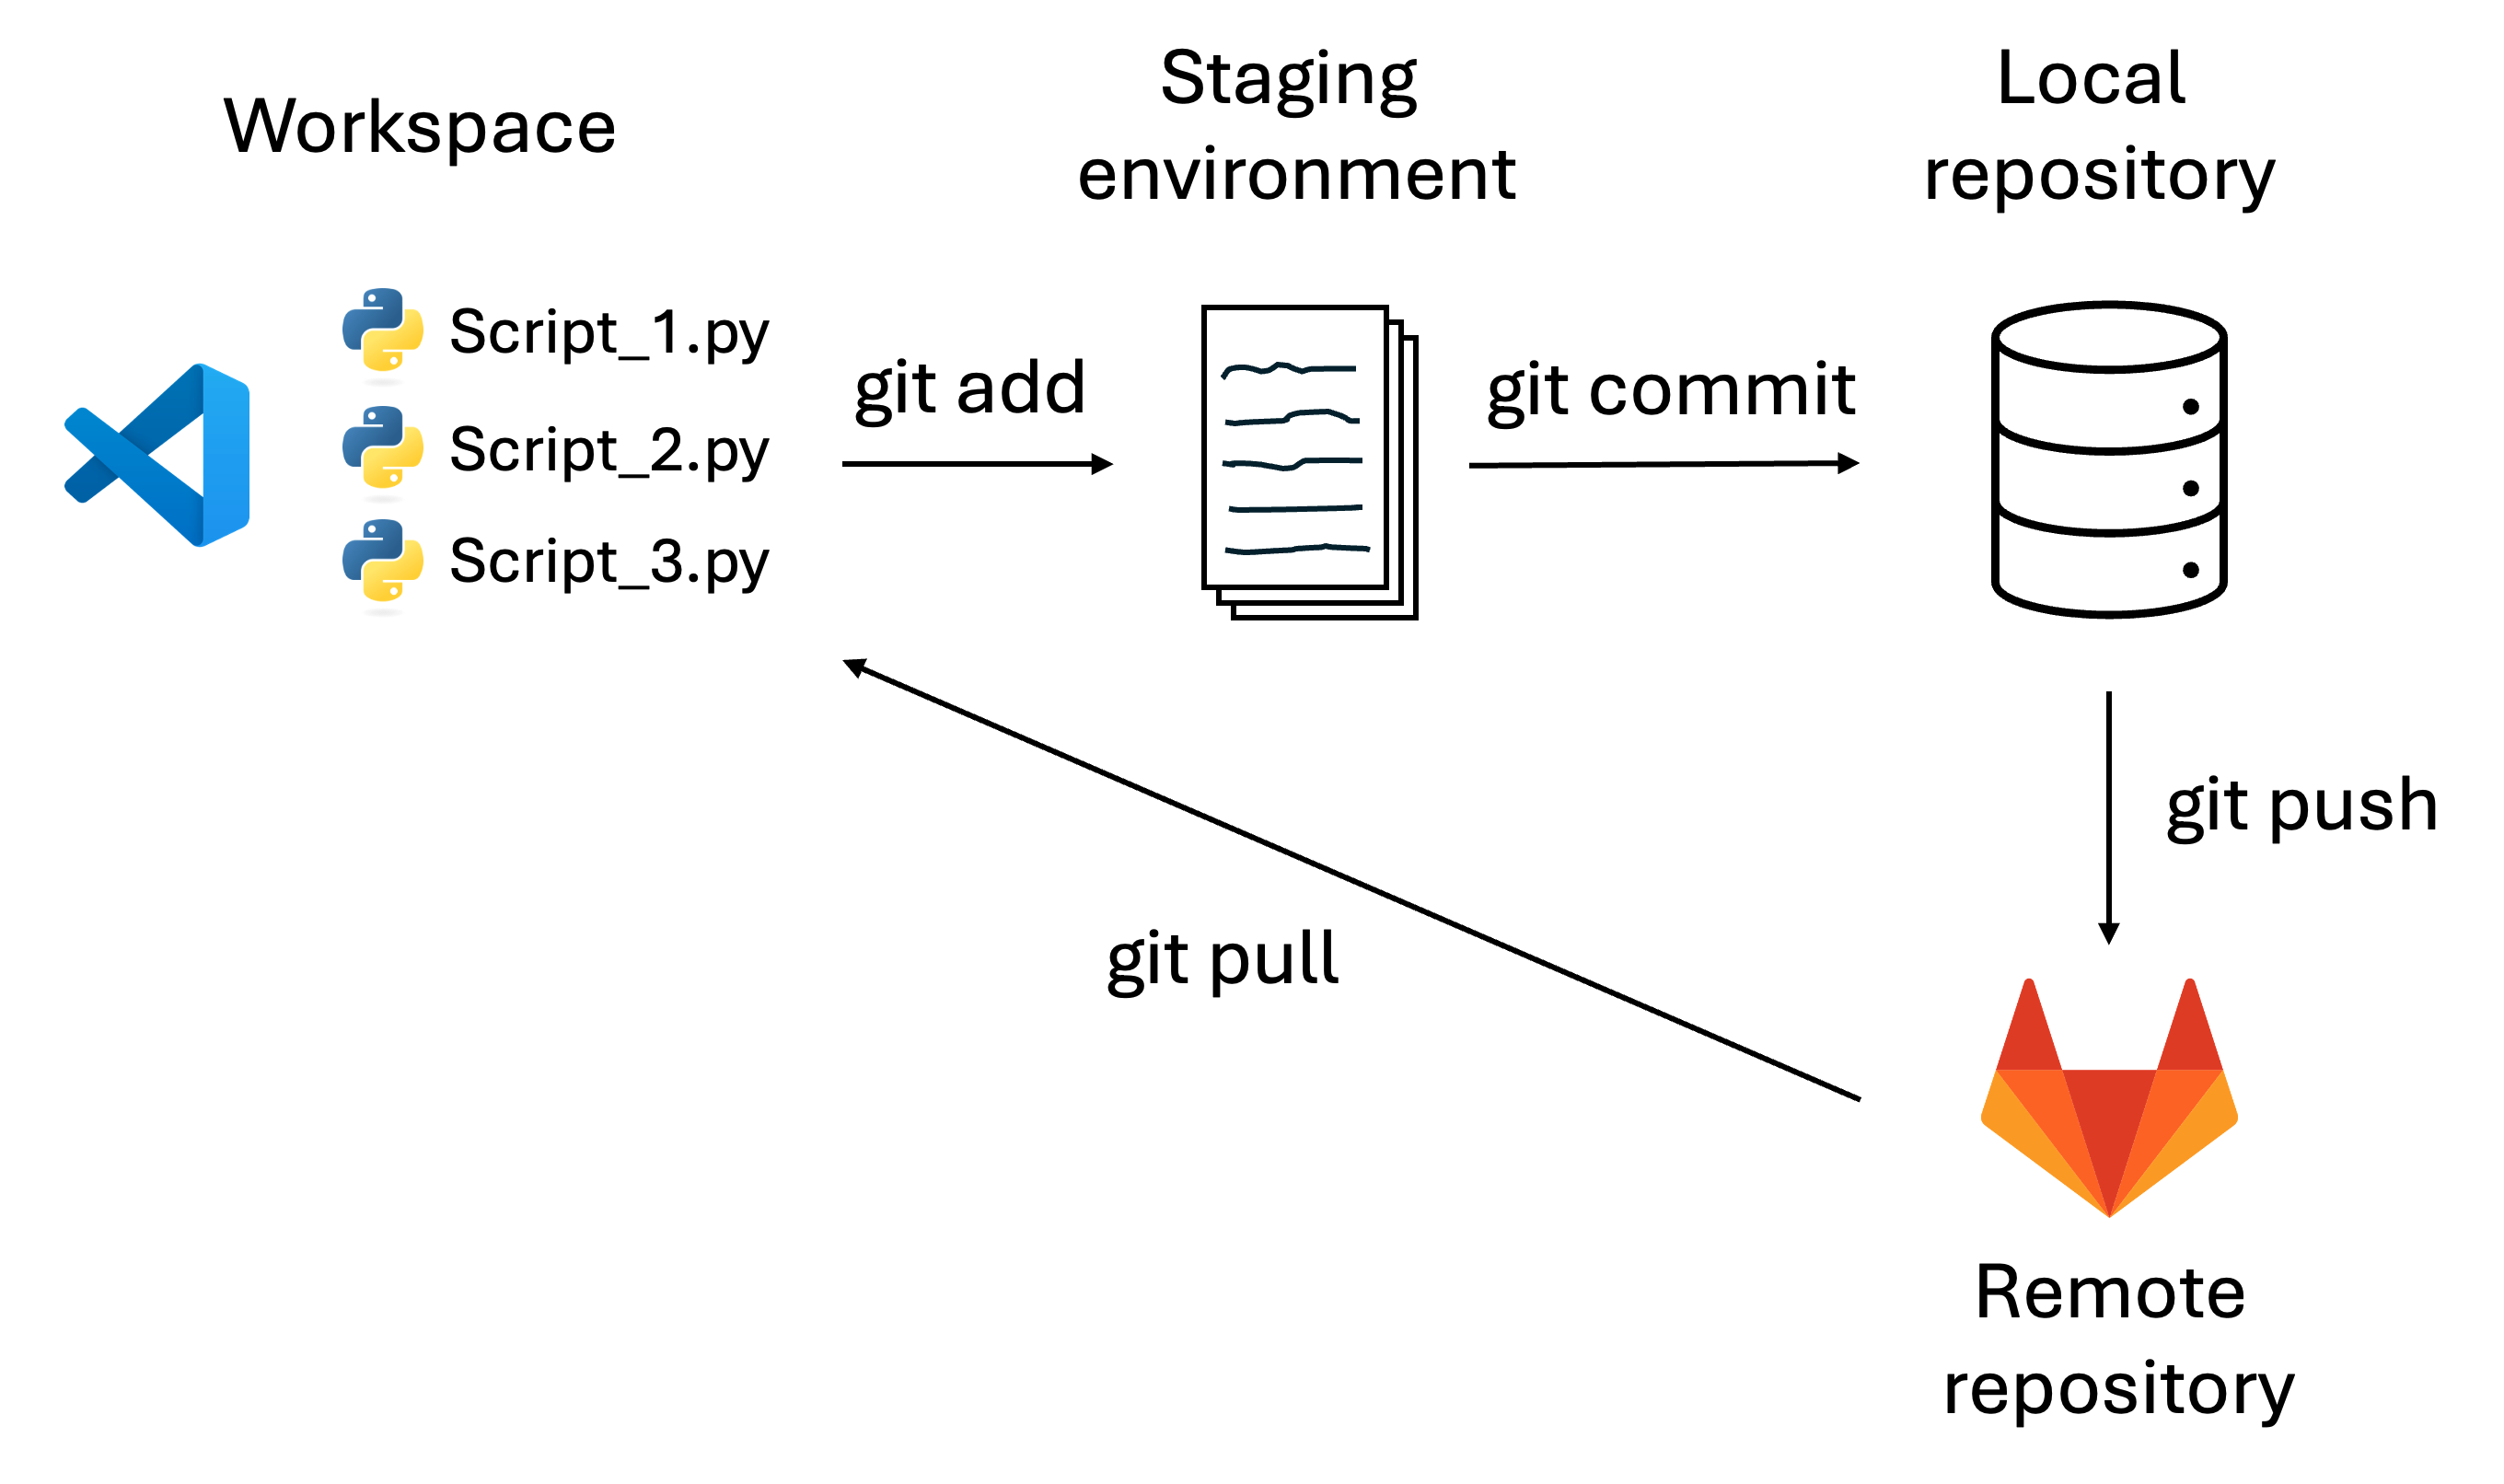
Fig. 3.6 Overview of Git and basic commands. Workspace, staging environment, and local repository are all local, while the GitLab repository is remote.#
Whenever you reach a milestone in your code or finish a part of the work, you should add files to the staging environment (command git add).
Staged files are then ready to be committed to the repository (command git commit).
You can think of a commit as a “save point” to which you can then go back (as in Fig. 3.5).
It’s good practice to add a message to each of your commits - this will allow you (and others, if you’re collaborating on a code) to easily remember what your commit was about.
Finally, you can push (command git push) your changes to your remote repository on GitLab, and vice versa, get files from a remote repository with pulling (command git pull).
In this context, a repository contains all project files, including the revision history.
Backup
Note that regularly pushing your files not only allows you to go back through the changes of your code, but it also serves as a backup. Should anything happen to your computer, your Python scripts will still be living safely in your GitLab repository.
In its entirety, Git is a rather complex software (e.g., check out this Git glossary to get an idea). Down the line, learning more about Git will allow you to do more complex things than just committing and pushing your changes.
3.4.2. Git in practice (TU Delft-specific)#
GitLab vs. GitHub
This section describes linking VS Code to GitLab, which is specific to the Delft University of Technology and may be applicable to other institutions who host their own GitLab. Besides GitLab, GitHub is another very popular platform for code version control which many individuals use. If you’re not using GitLab, we therefore recommend you to open a GitHub account. Note that some of the instructions below still apply, so it may still be useful to go through them. If you are currently at TU Delft, notice that you’ll lose access to its GitLab after you leave the university - you can then open an account on GitHub and use it for version control and collaboration on your future coding projects.
Your remote repository will be at TU Delft-hosted GitLab, to which you can sign in with your NetID and password.
In order to perform actions of committing and pushing changes to GitLab, you will integrate your GitLab repositories with VS Code. In total, you will have two repositories:
Your private repository, where you will be able to access, work, and store your exercises.
A shared repository with one of your peers, which you will use for peer feedback.
Let’s set up GitLab and link your two repositories to VS Code.
3.4.2.1. Setting up GitLab - SSH key#
An SSH key acts like a digital pass, allowing GitLab to verify that you are authorized to access the repository from your local computer. Without an SSH key, GitLab won’t let you push or pull changes because it can’t verify that you’re a trusted user. Adding an SSH key is a one-time setup step that simplifies your workflow by allowing you to push and pull without repeatedly entering your GitLab username and password.
Therefore, we will first set up the SSH key.
Login to TU Delft GitLab using your NetID and password.
You should be able to see your repositories - a private repository and a repository shared with your peer. A repository (also called project) looks like this:
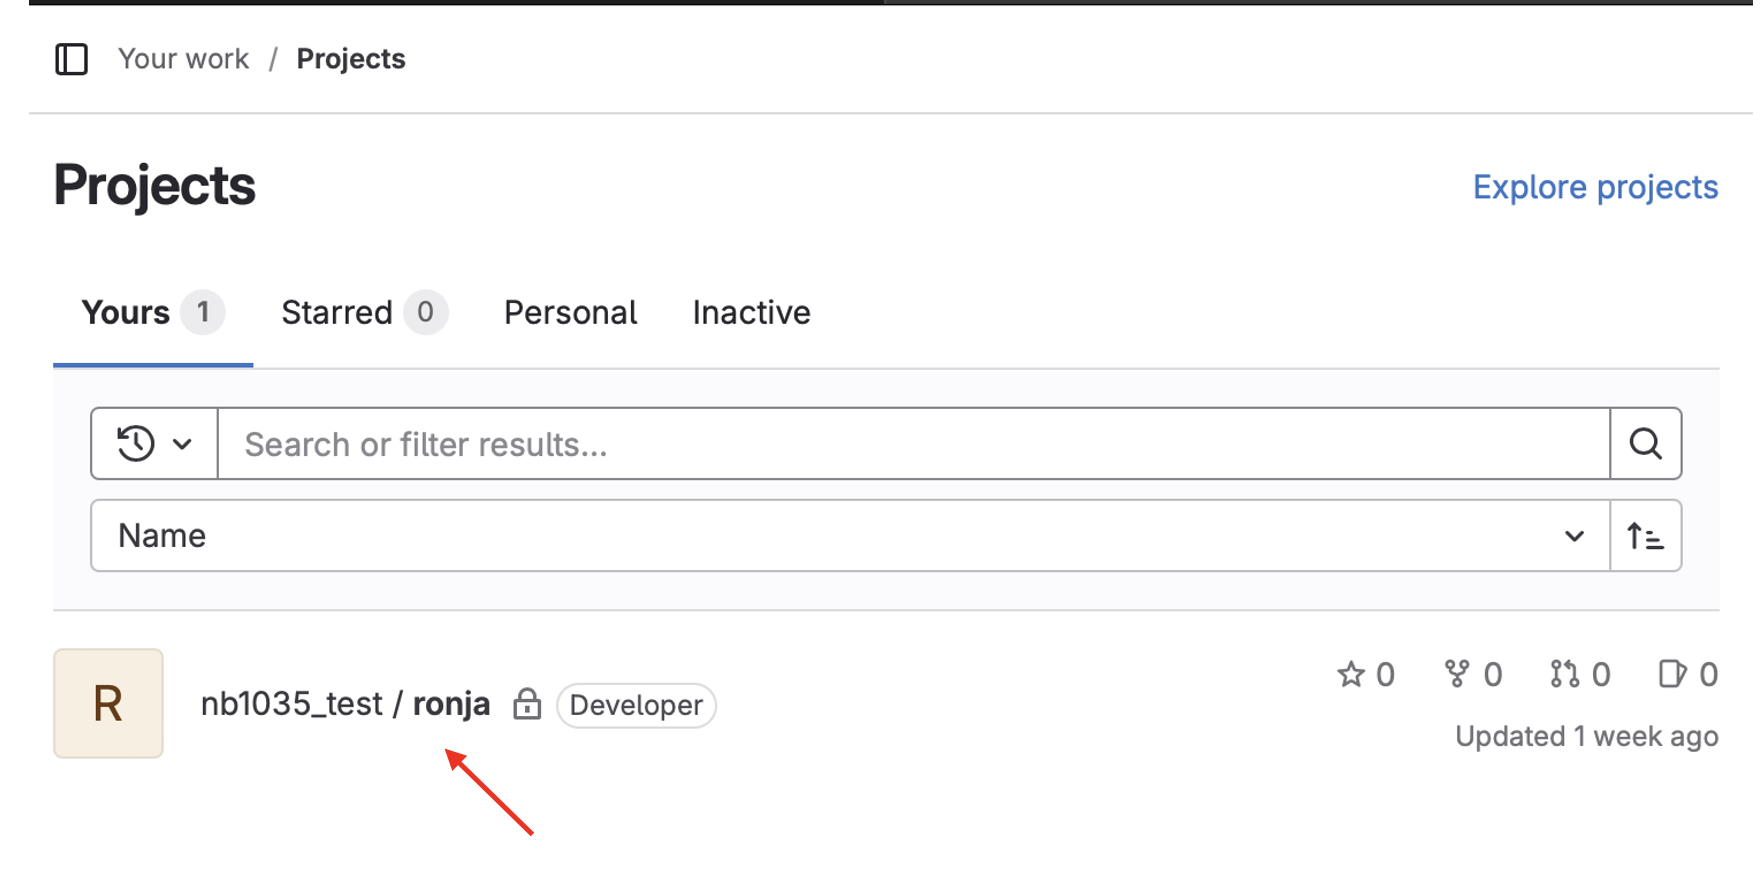
If you click on the name of your project (red arrow on the figure above), you will see a page like this:
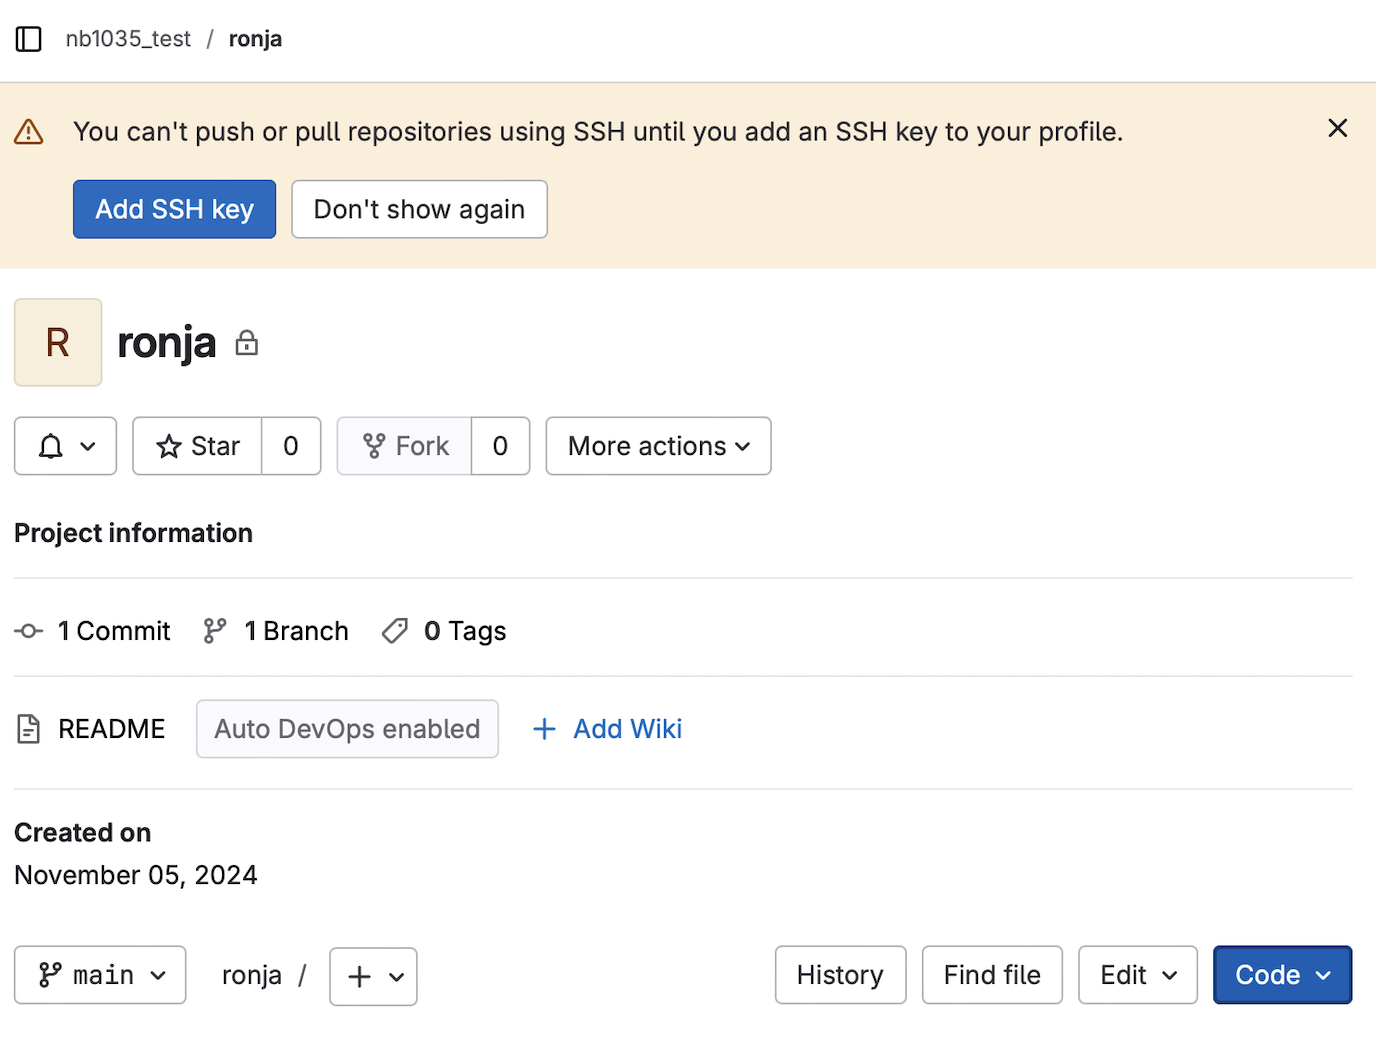
You will notice the warning regarding the SSH key at the top of the screen.
If you’re working with Windows OS, open Cygwin and navigate with
cdto/cygdrive/c/Users/username/. As username, use the one you are currenly logged in with at your laptop. To check if you already have an SSH key, runls .ssh. On macOS and Linux, you can runls .sshdirectly after opening your terminal. Once you run the command, look for files namedid_rsaandid_rsa.pub, or similar. If you don’t see them, you need to generate a new SSH key.To generate a new SSH key, run
ssh-keygen -t rsa -b 4096 -C "your_email@tudelft.nl"in your terminal. When prompted, you can pressEnterto accept the default file location. You will also be asked to set a password/passphrase - you can leave this empty by pressingEntertwice.Now that you’ve generated the key, you need to copy it and then paste in GitLab. To copy your key, run command
cat .ssh/id_rsa.pubin your terminal. Select and copy the entire output, staring withssh-rsa. In Cygwin terminal, you may need to use right-click > Copy instead of the usualCtrl + Cshortcut.In GitLab, in the upper left corner, find your user profile picture, click on it, and select Preferences. Then in the new left sidebar that appears, find SSH Keys and click on it.
Paste your SSH Key into the Key field. Add a title for the key (for example, “My Laptop SSH Key”). As Expiration date, select a date approximately 5 years in the future (such that your key is valid throughout your studies). Then click Add key.
Run this command in your terminal to test the SSH connection to GitLab:
ssh -T git@gitlab.tudelft.nl. You may get a warning that the authenticity of host cannot be established and asked whether your want to continue connecting. Type in yes and pressEnter. If you chose a passphrase in step 5., you may also be asked to enter it. If you haven’t, just pressEnter. You should then see a message like “Welcome to GitLab, @username!”, which means the connection is working.
3.4.2.2. Git integration in VS Code#
We will clone/download GitLab repositories to your computer from within VS Code. You will first clone your private repository from GitLab. Then you can repeat the steps below for the shared peer feedback repository.
If you’re not already logged in, login to TU Delft GitLab using your NetID and password. You should be able to see your repositories - a private repository and a repository shared with your peer. If you cannot find them, click on your profile picture and then profile name. This will bring you to your repositories list.
If you click on your project, you will see a page like this:
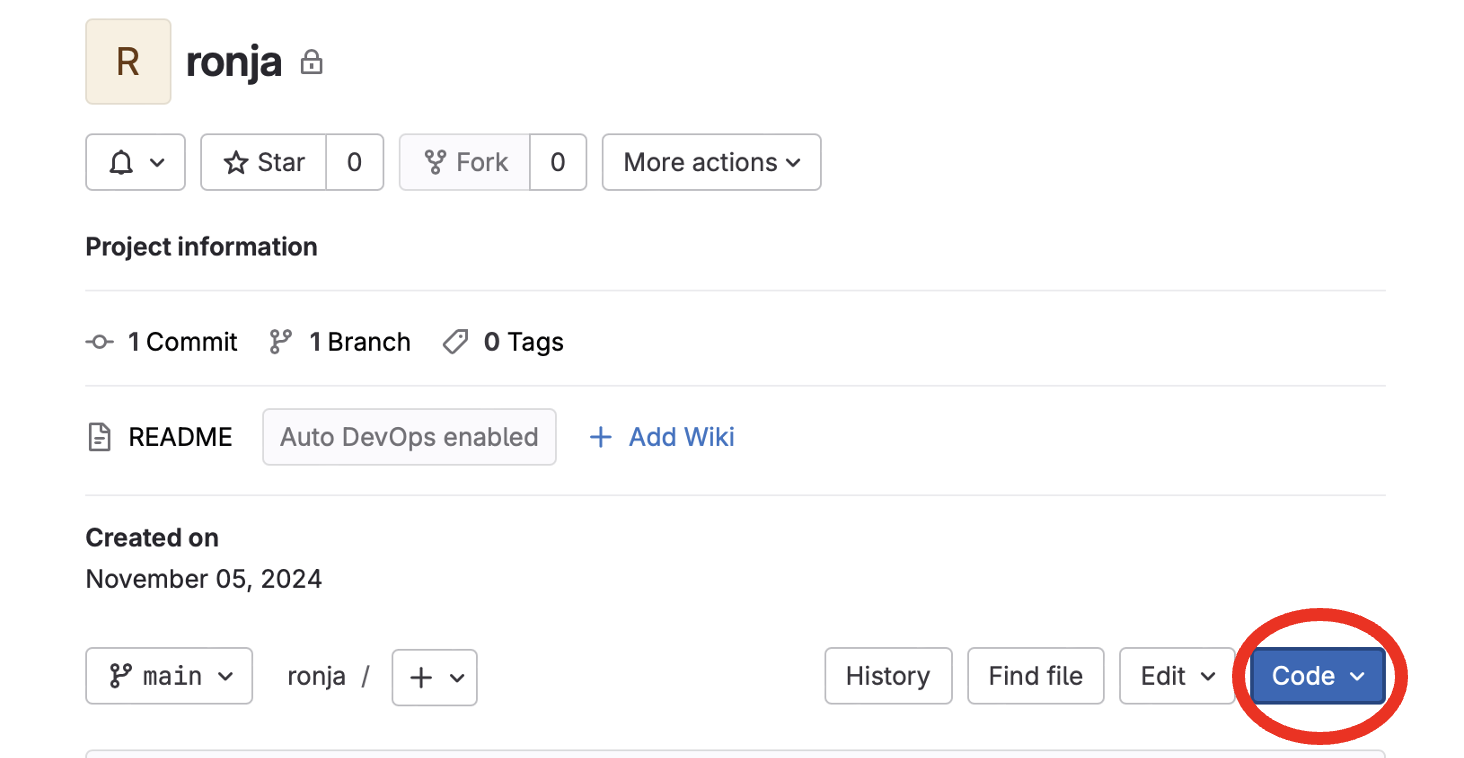
Click on the blue button “Code” (circled red on the image). In the dropdown menu, press the copy icon next to “Clone with SSH” to copy the link to your repository. You are now ready to go to VS Code.
Open your VS Code. In VS Code, open its built-in terminal (at the top bar, select Terminal > New terminal) and navigate with
cdto yourDocumentsfolder. Then run the following commandgit clone PASTE_LINK_FROM_STEP_3_HEREin VS Code terminal. When the command is done running, a folder of the same name as your GitLab repository will appear on your computer (it has been “cloned”).Next, in VS Code, click on File > Open folder, then navigate to your newly created folder from step 4, and press Select. You’re now in the local copy of your GitLab repository.
Now repeat these five steps for your shared peer feedback folder.
You can then start working on your Python projects and manage Git directly in VS Code. To learn how, read the subsections below.
SSH vs. HTTPS
Using SSH instead of HTTPS has a few practical advantages:
Easier authentication: With SSH, once you’ve set up your SSH key and added it to your GitLab profile, you don’t have to enter your username and password each time you push or pull. SSH keys provide secure, password-less access to your GitLab repositories, which is particularly helpful if you’re frequently pushing or pulling changes (which you are encouraged to do).
Enhanced security: SSH keys are generally more secure than password-based authentication. When you use an SSH key, you are authenticated through a key pair (a public and a private key) instead of through a password. This reduces the risk of unauthorized access, especially for sensitive repositories.
Avoiding rate limits or two-factor authentication prompts: Some Git platforms, including GitLab, enforce rate limits on HTTPS requests or require re-authentication due to two-factor authentication (2FA) policies. With SSH, once your key is configured, these restrictions won’t interfere with your workflow.
3.4.2.3. Working with Git in VS Code#
There are two main ways in which you can work with Git in VS Code: using VS Code’s built-in terminal or using visual icons in VS Code. We will describe both, it’s up to you to choose your preferred way of working with Git.
3.4.2.3.1. Using VS Code icons#
Checking Git status in VS Code
On the left sidebar, click the Source Control icon (represented by a branch icon).
VS Code will show the current state of the repository:
Untracked files: New files added.
Modified files: Files that have been changed.
Making changes, staging, and committing
Make changes to the Python code in the editor.
In the Source Control tab, hover over the file and click the
+icon to stage the changes.Write a commit message in the input box at the top of the Source Control tab (e.g., “Added function to calculate sum”).
Click the checkmark icon (
✔) to commit the changes. Important: when you do this for the first time, VS Code will give you a warning about user.name and user.email not being defined. To resolve this issue, go to the VS Code built-in terminal and run the following two commands one by one:git config --global user.name "your_netID"andgit config --global user.email "your_email@tudelft.nl". If you then try commiting again, it should work.
Pushing changes to GitLab
After committing, push the changes to GitLab by navigating to push icon in the left sidebar (it looks like a circle with an arrow up, and if you hover over it you should see “Push”). Important: the first time you push, you will be asked whether you want VS Code to automatically run “fetch”. Select no, and then try pushing again.
The changes will now be uploaded to your repository on GitLab. You can check it by logging in to your GitLab, and if needed refreshing the repository page.
Pulling updates from GitLab
If someone else (teachers or peers/collaborators) makes changes in your repository, you can pull the latest updates:
Go to the Source Control tab.
Click the three dots at the top and choose Pull to fetch the latest changes.
3.4.2.3.2. Using VS Code terminal#
You can perform the same actions described above also within VS Code terminal. It is important that you’re located in the correct folder in your VS Code terminal, i.e., the folder that is linked to your GitHub repository.
To see which files have changed in your local folder since you last pushed to Git, run
git status. The names of these files will appear in red.To stage all your changes, run
git add .. If you now rungit statusagain, you will notice your file names changing to green.To commit changes, run
git commit -m "descriptive message of your changes". It’s useful to write informative commit messages in quotes, as it allows you to easily track what you’ve changes with each commit.Finally, to push the changes from your local repository to the remote one on GitLab, run
git push. If you go to your GitLab repository, you will see that the files are now changed.
If someone else (teachers or peers) makes changes in your repository, you can pull the latest updates with git pull.
3.4.2.3.3. Collaboration#
You can collaborate on GitLab by:
Committing your changes.
Pushing your changes to the shared repository.
Pulling the changes made by others from GitLab.
Merging conflicts
With Git, it is possible to collaborate on the same piece of code. In that case, the changes made by different people are merged once they push them to Git.
VS Code handles merging changes automatically, but in case of conflicts (e.g., when two people modify the same file, which in principle shouldn’t happen during peer feedback), Git will flag the conflict, and VS Code will help you resolve it.
If working with VS Code terminal, you can use the following command to this purpose: git config pull.rebase false.