4.2. Version control with Git#
When working on projects, whether coding, writing reports, or analyzing data, you often create and modify many versions of the same file. Which file is the latest one? Who changed what? How do we go back to an older version if something breaks in the new one? Without a proper system, these questions quickly become overwhelming. To see just how easily things can spiral out of control, let’s look at a simple real-life example.
4.2.1. Why do we need version control?#
Imagine being on the final stages of a group project with two other Nanobiology students. You (Alice) have just finished writing your parts of the introduction and results and email them to Bob and Carlos. Suddenly, there are multiple files like:
report.docxdata.xlsxscript.py
Bob has been working on an older version without realizing it, and Carlos discovers that script.py does not contain an essential function that you had written weeks ago. Now the three of you are stuck puzzling together individual chunks of text from three separate files with only half an hour remaining until the deadline. You go digging through the attachments of five separate email threads, but to no avail… Maybe you deleted that particular email when cleaning up your inbox?
Does this sound familiar? You may have encountered a situation like this during high school. Nowadays, people often circumvent some of these issues with products such as Google Drive or the cloud features of Word and Excel. But neither is a good fit for writing code that you plan to run on your own machine. Copying and pasting files from and into the cloud usually comes with a massive headache.

Fig. 4.5 Alice, Bob, and Carlos staring at the disagreement between their report versions (left panel). Git makes version control easy (right panel). Git Logo by Jason Long is licensed under the Creative Commons Attribution 3.0 Unported License.#
This is where Git, the most popular software for version control comes to our rescue. Git allows you to track changes to your project, down to small changes in individual files, such as deleting a line or a word. Importantly, collaborating with other people on a Git managed project comes with some big advantages. You can work on the project locally and share your changes with your collaborators when you are ready. Git then helps you merge each collaborator’s changes into one central main version, while still keeping track of who made which changes.
The drawback of Git is that you have to be specific with it. You have to inform it which changes to track and when to push your changes to your collaborators. Luckily, this is very easy — even though it can seem intimidating in the beginning.
Tip
We recommend you to regularly use Git both while learning with this book as well as in all your future programming. It’s one of the best practices in coding (and collaboration) and a great habit to build from the start.
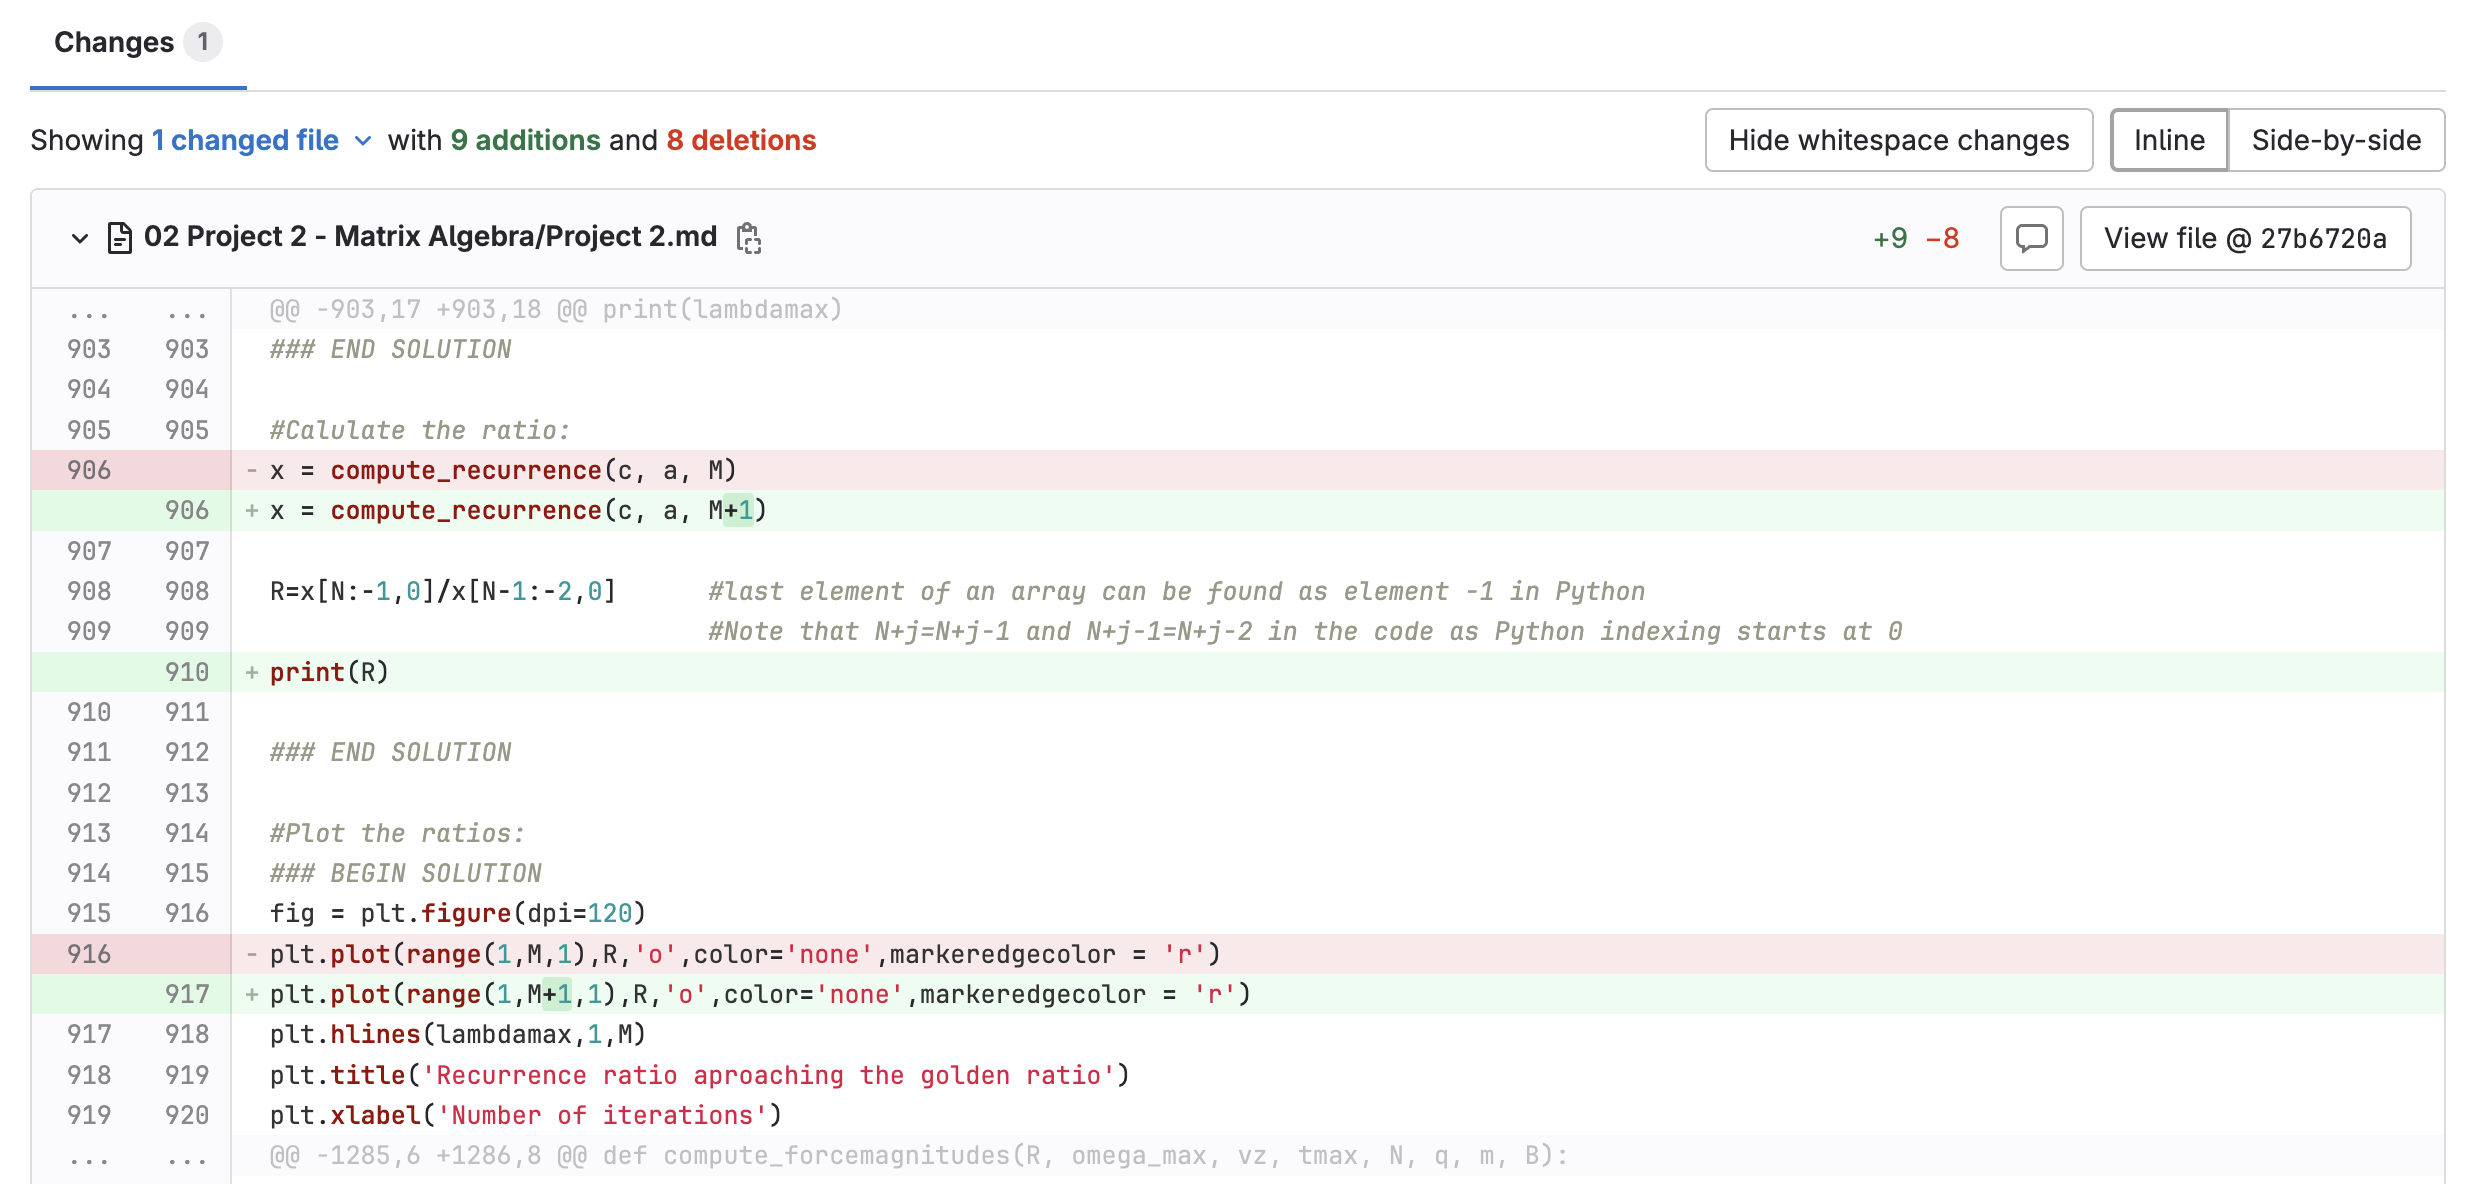
Fig. 4.6 Python code with tracked changes (additions in green and deletions in red).#
4.2.2. Git in a nutshell#
You will work only with the basics of Git. That’s all you need to start saving your work safely, keeping track of older versions, and sending your files to (or retrieving them from) a shared online repository.
Think of Git as a time machine for your project folder. Every time you tell it to remember your progress, it saves a snapshot. Later, you can go back in time, or combine your work with others. Let’s get acquainted with the basic functioning of Git and the appropriate terminology.
4.2.2.1. Basics of Git#
A project folder managed by Git is called a repository. This is simply a folder on your computer, but with a special feature: it also keeps a history of all changes. Usually, a cloud version of the repository is hosted by services such as GitLab or GitHub.

Fig. 4.7 You can think of a repository as just another folder on your computer.#
A repository on your computer is called the local repository.
A repository stored on the internet (e.g., TU Delft GitLab or GitHub) is called the remote repository.
To start working on an existing project, you create a local copy of the remote repository using the command
git clone <link>. We did this earlier during the setup.
The local repository (which essentially is your project folder) acts in practice just like any other folder on your computer. Git can tell the difference between a repository and a folder by the hidden .git/ folder at the root of every repository. Note that generally terms folder and repository are used interchangably, but they do mean different things to Git.
Tip
You only clone once at the beginning of a project to download the repository onto your computer. After that, you continue working inside this local folder and use git pull and git push to stay in sync with the remote repository.

Fig. 4.8 Overview of Git and basic commands. Workspace, staging area, and local repository are all local, while the GitLab repository is remote. GitLab logo used in accordance with GitLab’s brand guidelines.#
Tracking files
When you make changes to files in the project folder, Git does not track them automatically. You need to tell Git which changes to remember.
4.2.2.2. The Three-step Procedure#
In most of your work, you will only need these three commands. For the sake of this textbook, we will refer to them as the Three-step Procedure:
git add .
git commit -m "Describe your changes in one concise line"
git push
These three lines are the core routine of Git:

4.2.2.2.1. Prerequisites#
Before using the Three-step Procedure, two other conditions must first be met:
A. Clone the remote repository - git clone <link>, run this command once, at the beginning of a project to create a local copy (local repository), as we did earlier.

Fig. 4.9 Cloning the remote repository. GitLab logo used in accordance with GitLab’s brand guidelines.#
B. Make a change to a file in the repository. It only makes sense to perform the Three-step Procedure if there is a file change you want to track.

4.2.2.2.2. Steps explained#
Let’s now look at what each of the steps in the Three-step Procedure actually does, and why they are important:
Stage the files -
git add <filename>marks changes you want Git to remember. Most of the time you will just usegit add .to stage all modified/added files at once.

Commit the files -
git commit -m "message"saves a snapshot of your project. Think of it like pressing Save in a game - you can always come back to this point.

Push your commits -
git pushsends your saved snapshots (commits) to the remote repository, so they are backed up and accessible to other collaborators. If you open your web browser such as Google Chrome or Safari and navigate to your GitLab repository, you will see the pushed changes there.

Fig. 4.10 GitLab logo used in accordance with GitLab’s brand guidelines.#
Additional arguments for add and commit
git add .→ stage all changes at once. The dot at the end tells git to stage all changes, not just the changes to a single file.git commit -m "message"→ save a snapshot with a short description.
Without-m "message", Git will open a separate editor for the commit message.
You should perform the cycle of git add, git commit and git push (steps 1-3) whenever you have reached a milestone in your code or finished a part of the work.
4.2.2.2.3. Step 4 - git pull#
There is an additional step 4. You should make a habit of running git pull before pushing your changes, or from time to time during your work, to make sure your local repository stays synchronized with the remote one. This matters only when the remote repository has changes that your local repository does not, for example when someone else has pushed their updates. In other words, if you’re working in a repository that’s only yours and nobody else has access to, this is not relevant.
Pull changes -
git pullbrings in updates from the remote repository to your computer (to your local repository). This command basically keeps you synced with others.

Fig. 4.11 Using git pull when working collaboratively. GitLab logo used in accordance with GitLab’s brand guidelines.#
It is also good practice to monitor the state of your repository once in a while with git status. This tells you which files are currently in the staging area and whether your local repository is up to date with the remote repository.
Backup
Note that regularly pushing your files not only allows you to go back through the changes of your code, but it also serves as a backup. If anything happens to your computer, your Python scripts will still be safely stored in your GitLab repository.
In its entirety, Git is a rather complex software (e.g., check out this Git glossary to get an idea). Down the line, learning more about Git will allow you to do more complex things than just committing and pushing your changes.
4.2.3. Using Git in VS Code#
There are two main ways in which you can work with Git in VS Code: using VS Code’s built-in terminal or using Graphical User Interface (GUI) in VS Code. We will describe both, it’s up to you to choose your preferred way of working with Git. Essentially, both ways are describing how to use the Three-step Procedure in practice.
4.2.3.1. Using VS Code GUI#
Checking Git status in VS Code
On the left sidebar, click the Source Control icon (represented by a branch icon).
VS Code will show the current state of the repository:
Untracked files: New files added.
Modified files: Files that have been changed.
Making changes, staging, and committing
Make changes to the Python code in the editor.
In the Source Control tab, hover over the file and click the
+icon to stage the changes.Write a commit message in the input box at the top of the Source Control tab (e.g., “Add: function to calculate sum”).
Click the checkmark icon (
✔) to commit the changes. Important: when you do this for the first time, VS Code will give you a warning about user.name and user.email not being defined. To resolve this issue, see Setting-up Git. If you then try committing again, it should work.
Pushing changes to GitLab
After committing, push the changes to GitLab by navigating to push icon in the left sidebar (it looks like a circle with an upward arrow, and if you hover over it you should see “Push”). Important: the first time you push, you will be asked whether you want VS Code to automatically run “fetch”. Select “Yes”, because it lets VS Code automatically run
git fetch, which checks the remote repository for new commits and branches. It does not change your files - it only shows you that updates exist. You can then decide when to bring those changes into your branch withgit merge. Normally,git pulldoes this automatically since it’s basicallygit fetch+git merge, but you can also run these two steps separately (using the terminal) - first, periodically fetch to see what’s new, and then merge when you’re ready to apply the updates.The changes will now be uploaded to your repository on GitLab. You can verify it by logging in to your GitLab, and if needed refreshing the repository page.
Pulling updates from GitLab
If someone else (teachers or peers/collaborators) has made changes in your repository, you can pull the latest updates:
Go to the Source Control tab.
Click the three dots at the top and choose Pull to fetch the latest changes.
4.2.3.2. Using VS Code terminal#
You can perform the same actions described above for GUI also within the VS Code build-in terminal. It is important that you’re located in the correct folder in the VS Code terminal, i.e., the folder that is linked to your GitLab repository.
To see which files have changed in your local folder since you last pushed to Git, run
git status. The changed files will be listed in red.To stage all your changes, run
git add .. If you now rungit statusagain, you will notice your file names changing to green.To commit changes, run
git commit -m "descriptive message of your changes". It’s useful to write informative commit messages in quotes, as it allows you to easily track what you’ve changes with each commit.Finally, to push the changes from your local repository to the remote one on GitLab, run
git push. If you go to your GitLab repository, you will see that the files have been updated.
If someone else (teachers or peers) has made changes in your repository, you can pull the latest updates with git pull.
4.2.4. Collaborations & Conflicts#
4.2.4.2. Resolving Conflicts#
With Git, it is possible to collaborate on the same piece of code. Normally, Git merges changes automatically when they are pushed and pulled. However, if two people modify the same file in the same place, a merge conflict occurs. Git will flag the conflict, and VS Code will guide you through resolving it. Luckily, most merge conflicts are easy to resolve if you stay calm and follow some basic steps:
You have just pressed
🔄 Sync Changes 2 ↑after committing changes to your filescript.pyand now VS Code complains with:
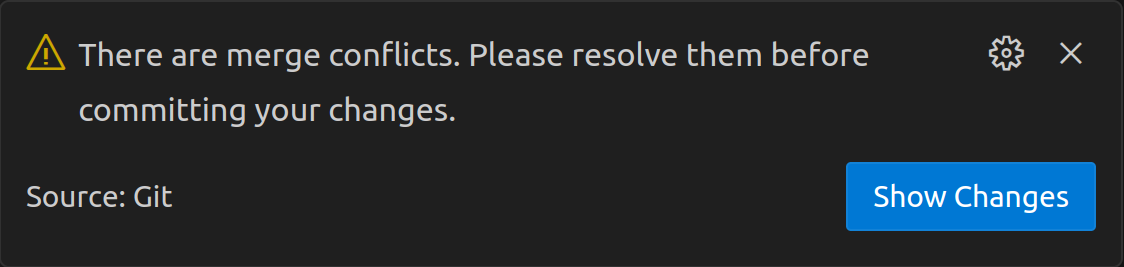
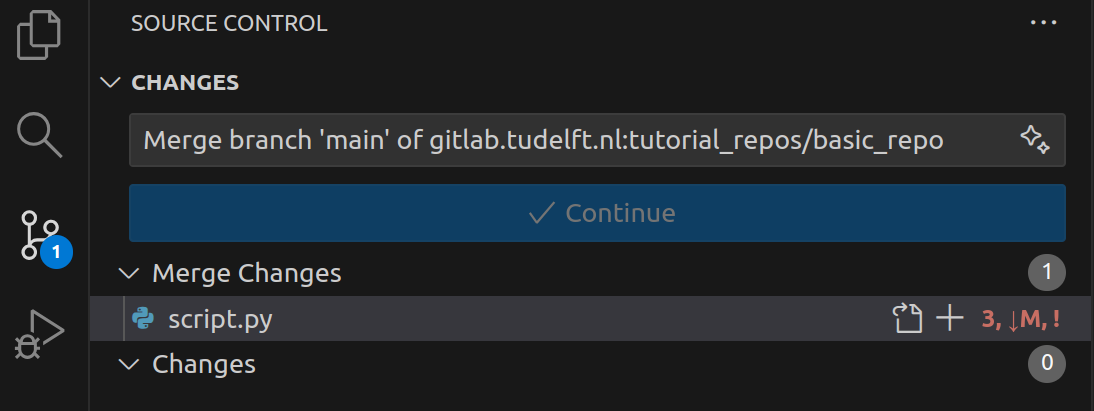
Under the Source Control tab in VS Code (Git icon), under the category “Merge Changes”, select the (one of the) file(s) that has caused the conflict.
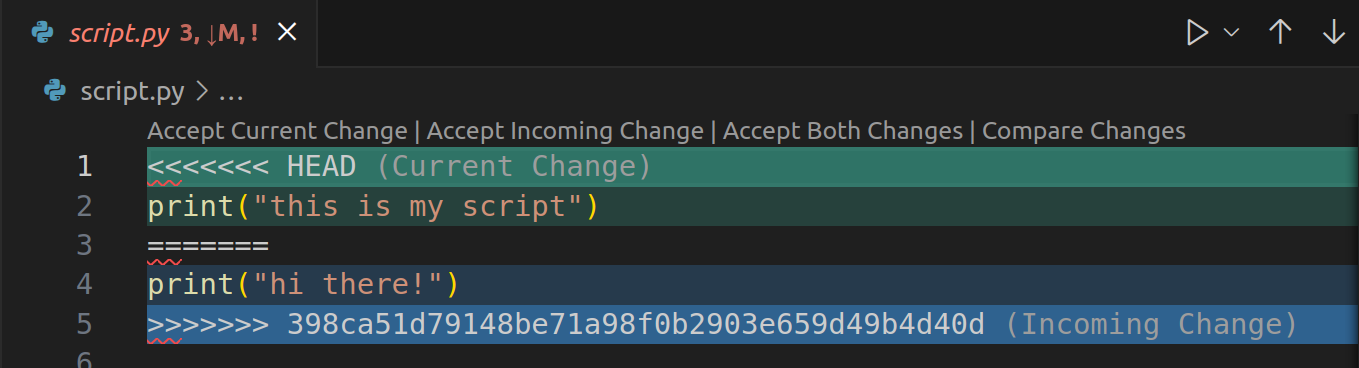
The conflicting areas are indicated by being between
>>>>>>> HEADand<<<<<<<. Your local changes (top) are separated from the changes coming in from the remote repository (bottom) by=======. In order to resolve this conflict, you can either selectAccept Current Change(your version) or selectAccept Remote/Incoming Changes(their version). Alternatively, if you are not satisfied with either, you can also resolve the changes by hand. Do so by removing the foreign symbols (>>>,===,<<<) and replacing everything in between with your perferred solution.
In the Source Control tab, add you file (+ icon), press
Continueand sync your changes.
You have just typed
git pullafter committing changes to your filescript.pyand now you get the error message:
Open the file (e.g.
script.py) that has caused the conflict.The conflicting areas are indicated by being between
>>>>>>> HEADand<<<<<<<. Your local changes (top) are separated from the changes coming in from the remote repository (bottom) by=======. In order to resolve this conflict, remove the foreign symbols (>>>,===,<<<) and replace everything in between by your perferred solution.Perform the Three-step Procedure.
(Advanced reading) Branches
If you want to make significant changes to a project that may impact others currently working on it, consider using branches. Branches are alternate versions of the same repository that are isolated from each other. Just like the main branch, they exist both locally on your machine and remotely on the cloud (e.g., on GitLab).
To create a new branch from an existing one (for example, creating new-branch from main) and later merge your work back into the main branch, follow the steps below:
Run
git branchto check which branch you are currently on.Run
git switch mainto make sure you are on the base branch (the one you want to branch off from).Run
git switch -c new-branchto create and switch to a new branch called new-branch.Run
git push --set-upstream origin new-branchto create a remote version of your new branch.Make and commit changes as usual (using the Three-Step Procedure). These changes will only affect
new-branch.When ready to integrate your work, run
git switch mainto return to the base branch.Run
git merge new-branchto merge the changes fromnew-branchintomain. This only affects themainbranch.Finally, run
git pushto upload the merged changes to the remote repository.
Learning how to work with branches unlocks many of Git’s powerful features, enabling safe collaboration and parallel development. It is, however, outside of the scope of this book.