
14.1. Exercises#
For the exercises on this page, you will need to use the NaNoPy package.
Each exercise carries the difficulty level indication:
[*] Easy
[**] Moderate
🖌️ Uses the NaNoPy graphical environment
Important
Do all NaNoPy exercises (🖌️), whatever their difficulty level. They build on each other, so skipping one makes the next ones harder.
Exercise 14.1 ([**] Moving particles 🖌️)
Exercise A: Write a program, using the writer tool, that draws a red circle with a radius of 25 pixels at a random position on the graphical window. Each time you re-run the program, the position should be different (random). Make sure the circle always fits completely within the screen.
Exercise B: Extend your code from exercise A such that it draws 100 red circles with radiuses of 5 pixels at random positions on the graphical window. Your program should incorporate:
Lists for the
xandycoordinates.A loop to fill the list with random coordinates.
A second loop to draw the circles.
Exercise C: Extend your code from exercise B such that it draws a 100 red circles. Every 100 ms a new circle should be added at a random position within the graphical window.
Exercise D: Extend your code from exercise C such that it draws 100 red circles one by one with 100 ms intervals at random positions on the graphical window, but now each time when a new circle is drawn, all previous circles should move one pixel down.
You can use a nested for loop: the outer loop determines the number of circles to be drawn and in the inner loop those circles will be drawn.
Exercise 14.2 ([**] Simulation of moving objects 🖌️)
In this exercise, you’ll be simulating the movement of objects through 2D space, such as a bouncing ball as well as random diffusion.
The code below simulates a ball moving from the left to the right side of the graphical window:
from NaNoPy import Canvas, Color, Writer

x_size = 800
y_size = 600
ball_x = 1
ball_y = 300
dx = 1.0
n_steps = 1000

c = Color.green

screen = Canvas("title", x_size, y_size)
pen = Writer(screen)

for i in range(n_steps):
    ball_x = ball_x + dx
    pen.draw_circle(ball_x, ball_y, 5, c, True)
    screen.update()
    screen.pause(5)
    screen.clear()

screen.keep_window()
Exercise A:
Run the code above and observe the result.
Then increase and decrease the speed at which the ball moves by modifying the
value for dx.
Exercise B:
Extend the code such that the ball initially moves very fast, then gradually
slows down before finally stopping at the right border of the graphical window,
by making dx depend on the position of the ball within the graphical window.
Exercise C:
Extend the code such that the ball moves from top to bottom. Add a variable
named dy.
Exercise D: Extend the code such that the ball moves in a diagonal line over the graphical window.
Exercise 14.3 ([**] Keeping an object within the screen 🖌️)
In the previous exercise, you made the ball move over the screen, but the code was written in such a way that the ball moved from left to right, then stopped at the end of the graphical window. When simulating a less regulated movement of a ball, the path is less predictable or even unpredictable, so containing the ball inside the graphical window should be programmed in a different way.
Exercise A:
The algorithm for bouncing is very simple: when the ball reaches the top or
bottom border of the graphical window, change the sign of the displacement
in vertical direction (dy = -dy). When the ball bounces to the left or right
side of the window, change the sign of the horizontal displacement (dx).
Write a Python program in which a ball moves in a diagonal line at constant speed and bounces when it reaches one of the borders of the graphical window. The ball should keep moving until the graphical window is closed. Try different angles of movement.
Exercise B:
Extend your code from exercise A such that it simulates the bouncing of a ball
in the presence of gravity: decrease the ball displacement in the vertical
direction when the ball is moving upwards, and increase the ball displacement
in the vertical direction when the ball is moving downwards by subtracting a
small value from dy (e.g., dy = dy - 0.1). If the ball bounces higher each
step, adjust the program so that the peaks are lower each time the ball bounces.
Exercise 14.4 ([**] Random particle diffusion 🖌️)
In this exercise, you will simulate the random movement of a particle.
Exercise A:
Generate random values for dx and dy between, for instance, -5 and 5. The
particle should not be allowed to move outside the graphical window. You can
change the speed at which the particle moves by varying the range of your
random values.
Exercise B: Extend your code such that instead of one particle,your program works with 100 particles and makes them move randomly.
Hints:
You’ll need a list with the
xcoordinates for the particles, and a list with theycoordinates for the particles.Perform separate tasks in separate loops.
When you update your graphical window for every particle individually, your program will slow down. To avoid this, first change the coordinates of all particles and draw them to the graphical window before updating it.
Exercise 14.5 ([**] Particle collision 🖌️)
Exercise A: Write a program where two different types of particles diffuse randomly within the graphical window. Use ten particles of each type, where each type has its own colour, size, and speed.
Hint: Store the properties of each particle in a list. Because the properties are different types of variables, create a list for each property. For instance, one list to store the sizes of all 20 particles, another list to store the colors of all the 20 particles, etc.
Exercise B:
Extend your code such that the particles seize to move when they meet/collide
with a particle of the other type. We define meeting/collision as the distance
of less than 15 coordinate units. Use the following equation of Pythagoras to
calculate the distance d between two particles P and Q:
d = sqrt{(Px - Qx)^2 + (Py - Qy)^2}
Hints:
In case it takes too long before particles stop, increase the distance for collision.
In exercise A, you’ve created multiple lists in which you store the different properties of each particle. In that exercise it might seem convenient to create a different lists per particle type, but would that still be convenient if you had, e.g., 300 different types of particles, all interacting with each other? Instead, try to see the type of a particle as a “property” of being of a different type. So, create a list in which you store the type of each particle and create a list to store the sizes of all the particles, a list to store the shapes of all the particles, one colour list, etc.
Exercise C: Extend your code such that it only stops particles from moving when they meet a particle of the other type that is moving as well (with a distance less than 5 coordinate units). Increase the number of particles and change the ratio between the two types to 40:60.
Hint: use an extra list in which you store the property of whether a particle is moving.
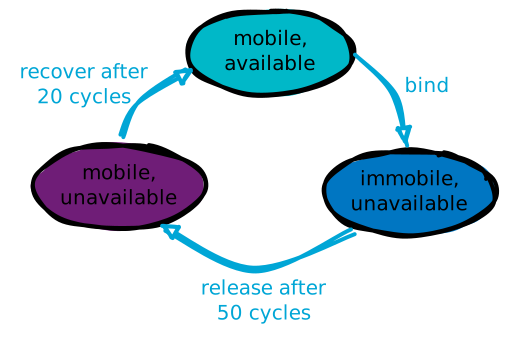
Exercise D: Extend your program such that if a particle binds (meets) a particle of the other type, it should change colour, stop moving, and stay bound for 50 timesteps. After those 50 timesteps, the particles should again change colour and start moving again, but remain unable to bind again for another 20 timesteps. After those 20 timesteps, the particles should go back to their original color and be able to bind again.
Hint: Create an extra variable (list) containing a property of the particle
keeping track of the passed runs of the while loop. This will help to keep
track of the timesteps in which the particle is bound or unable to bind.
Exercise E: Extend your code such that it lets particles bind with a probability of 0.1 per timestep and release with a probability of 0.01 per timestep. Notice that you will need to know which particles are bound together to release them both at the same time step.
Hint: Use random function to create a probability to test.
Exercise 14.6 ([**] Escape the container and monitor the situation 🖌️)
Exercise A: In this exercise, you will build upon your code from Random particle diffusion, Exercise B. There, you were able to keep the particles inside the graphical window. In this exercise, you’re asked to adjust the borders in such a way that 100 particles are now contained in a specified area. This container should be smaller than the screen. Make 3 versions with a square, a rectangular, and finally with a round container.
Hint: testing whether a particle is inside a square or rectangular container is similar to testing if it stays within the screen, like you did before. However, testing whether a particle is inside a circle is a bit different. A circle is made up of a sine and a cosine function, centred on the middle and is as big as its radius. If the distance between a particle and the centre of a circle is larger than the radius of that circle, the particle is not inside the circle anymore. Use this information to think of a test to keep the particles within the round container.
Exercise B: Extend your program from exercise A such that instead of a single round container you make three round containers and let there be 100 moving particles in each container. The particles should not escape the containers.
Hint: the particles should get a location within one of the three containers before starting the simulation. All particles should be tested for all containers even if they are not inside that particular container. If a displacement leads to the future location of a particle outside of any container, this displacement should not be made.
Exercise C: In exercise B we tested if particles were inside any of three containers. The code to check if particles are inside a container is very similar for each container, with just some changes in the location of the container and the size of the container. When there are many similar sections of code, you will recall from a previous book section that it’s useful to define a Python function.
In this exercise, you’re asked to rewrite the code to check if a particle is
in a container using a function. The inputs should be the x and y location of
the particle, and the x and y location and radius of a container. The output
should be a Boolean returning True if the particle is in the container and
False if it is outside. For example,
def in_circle(x, y, x_container, y_container, r_container):
    output = # code to test if x and y are inside container
    return output
Now you can check if a particle is inside the container using:
if in_circle(x, y, x_c, y_c, r):
    # code to do if particle is in the container
Exercise D: Extend your program from exercise A, use the round container and the function from exercise C. When a particle tries to escape the container, introduce a chance of 25 % that it will succeed. See what happens when you vary the chance.
Hint: Use the random function to create a probability.
Exercise E: Extend your code from exercise D such that if a particle escapes the container, make it change colour and size.
Exercise F: Extend your program from exercise E such that you keep track of the number of particles inside and outside of the container. Plot these numbers against time in a graph in a new graphical window positioned next to the graphical window with the moving particles. Therefore, another screen is required. Define this directly after the original screen:
chart = Canvas("charttitle", x_size, y_size, xpos=50, ypos=50)
The last two arguments define the location of the chart, in this case at 50 pixels outside of the left upper corner of your screen.
Hint: Think about how you would draw a dynamic graph using the NaNoPy package and what type of graph you want to plot.
Exercise 14.7 ([**] Collisions between many particles 🖌️)
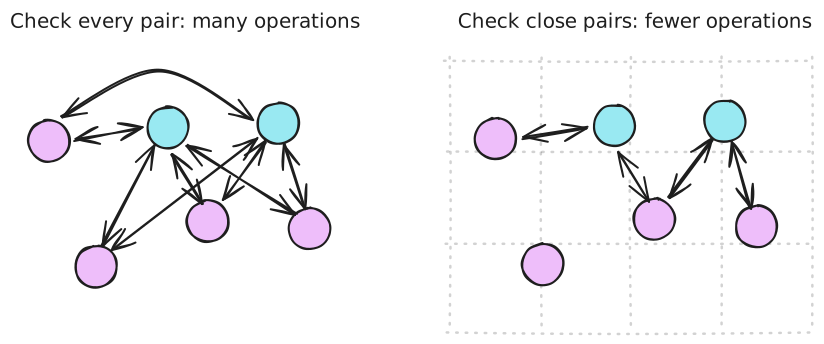
Fig. 14.1 The get_close_pairs and apply_to_close_pairs functions select particles that are spatially close for further computation.#
Prerequisite: This exercise builds on previous exercises where you implemented collisions between particles.
Exercise A: Adapt your code to show at least 1000 particles of each type. Does your code still run at a decent speed?
Exercise B: Find out which part of your code is responsible for the slowdown. Can you explain why?
Exercise C:
The NaNoPy package contains a method for simulating particle collisions more
efficiently. Read the documentation for the get_close_pairs and
apply_to_close_pairs functions.
get_close_pairs gives you the indices of particles that are close to each other:
from NaNoPy import get_close_pairs

xs = [10, 12, 200]
ys = [10, 15, 300]

for i, j in get_close_pairs(xs, ys, 20):
    print(i, j)
apply_to_close_pairs runs the function below it once for every close pair:
from NaNoPy import apply_to_close_pairs

xs = [10, 12, 200]
ys = [10, 15, 300]

@apply_to_close_pairs(xs, ys, 20)
def print_pair(i, j):
    print(i, j)
Exercise D: Upgrade your collision detection with one of the two functions. Note that the functions only check rough proximity. You still need to check the distance for particles that are close.
Explanation for speed-up: Under most conditions, the functions provided in NaNoPy are faster than checking each particle distance at every step. This is because they first assign particles to smaller groups based on rough location, thereby avoiding unnecessary checks.