
10. NumPy Arrays#
10.1. Import NumPy#
The first step to use NumPy is to import it. You can do that using import NumPy. Importing allows a Python file or a Python module to access the script from another Python file or module so that we can have access to its functions and properties.
Ususally we import NumPy as np alias; this is just a shorter name referring to the same thing. This is optional.
import numpy as np
Here is a basic example of initializing a NumPy array:
a = np.array([1, 2, 3])
print(a)
[1 2 3]
10.2. How are lists different from NumPy arrays?#
When writing code, there are often multiple ways to achieve the same result. However, the speed of the program is usually important, so choosing the faster method is more convenient. While both lists and NumPy can sometimes accomplish the same tasks, NumPy is generally faster and more memory-efficient. Additionally, there are some operations that lists cannot perform at all, but NumPy can. Here are some examples:
# Lists
a = [1, 3, 5]
b = [1, 2, 3]

# print (a*b)   # gives error!!!
# Numpy
a = np.array([1, 3, 5])
b = np.array([1, 2, 3])

print (a*b)   # it works!!!
[ 1 6 15]
10.3. Creating Array#
To create an array you can use the np.array() function; as the input we can pass a numerical list. Below, you can see some examples of one-, two- and three-dimensional arrays.
a=np.array([1,2,3])  #1D array
print(a)
[1 2 3]
B=np.array([[1,2,3],[4,5,6]]) #2D array
print(B)
[[1 2 3]
 [4 5 6]]
C=np.array([[[1,2],[3,4]],[[5,6],[7,8]]]) #3D array
print(C)
[[[1 2]
  [3 4]]

 [[5 6]
  [7 8]]]
💡Note that NumPy arrays are of type ndarray. You can check this using type(array_name).
print(type(B))
<class 'numpy.ndarray'>
10.4. Dimension, Shape, and Size#
Dimension, shape and size refer to different properties in arrays. It’s important to know and check them in our program. Here’s a brief definition,
Dimension: the number of axes (dimensions) of the array.
✅ Syntax:
array_name.ndimShape: This is a tuple of integers indicating the size of the array in each dimension. For a matrix with n rows and m columns, the shape will be (n,m).
✅ Syntax:
array_name.shape.Size: the total number of elements of the array. This is equal to the product of the elements of shape.
✅ Syntax:
array_name.size
print("a_dimention =",a.ndim)
print("a_shape =",a.shape)
print("a_size =",a.size)
a_dimention = 1
a_shape = (3,)
a_size = 3
print("B_dimention =",B.ndim)
print("B_shape =",B.shape)
print("B_size =",B.size)
B_dimention = 2
B_shape = (2, 3)
B_size = 6
print(C.ndim)
print(C.shape)
print(C.size)
3
(2, 2, 2)
8
10.4.1. np.newaxis#
It’s important to note that one-dimensional arrays are different from two-dimensional arrays in NumPy. Therefore, a column or a row vector can be saved both as a one- and a two-dimensional array. However, for most matrix operations using column/row vectors and matrices, you will need to have them both as two-dimensional arrays, or you will get an error. To add a new dimension to an array you can use the following command:
array_1D = np.array([1, 2, 3, 4])
print(array_1D.shape)

# row vector
array_2D_row = array_1D[np.newaxis, :] # Adds a new axis to create a 2D array with one row
print(array_2D_row.shape)

#column vector
array_2D_column = array_1D[:, np.newaxis] # Adds a new axis to create a 2D array with one column
print(array_2D_column.shape)
(4,)
(1, 4)
(4, 1)
10.5. Array Indexing#
You can access specific elements in an array by specifying their row and column indices using the syntax array_name [row, column] or by specifying the exact location in a multi-dimensional array using array_name [dim1_ind, dim2_ind, ...].
You can also easly access a specific row or column:
To access a specific row, use the syntax
array_name[row, :].To access a specific column, use the syntax
array_name[:, column].
You can also access specific elements in a row or column and skip the rest using a method called slicing. Slicing allows you to specify the start index, end index, and step size with the syntax array_name[start:end:step, start:end:step, ...].
Here is how the slicing syntax is interpreted:
Syntax |
Description |
|---|---|
[start : end] |
step size is 1 |
[start : : step] |
end is the last index |
[ : end : step] |
start is 0, the first index |
[ : ] |
all elements in that dimension with step=1 |
💡Remember that array indexing starts at zero.
Here are some examples to illustrate array indexing and slicing with multi-dimensional arrays:
# 3x3 2D array
a = np.array([[1, 2, 3],
              [4, 5, 6],
              [7, 8, 9]])
print("a= \n", a)
a=
 [[1 2 3]
 [4 5 6]
 [7 8 9]]
# Find the last element of the second row
print("a[1, 2]=", a[1, 2])
a[1, 2]= 6
# Find the last element of the first row
print("a[0, -1]=", a[0, -1])
a[0, -1]= 3
# Get the first row
print("First row=", a[0, :])
First row= [1 2 3]
# Get the first column
print("First column=", a[:, 0])
First column= [1 4 7]
# Slicing
print("Slicing: ")
Slicing:
print(a[0, 0:3:2]) # First row, start=0, end=3, step=2
# Selects elements from the first row (index 0)
# starting from the 0th index to the 2nd index (not including the 3rd index)
# taking every second element
[1 3]
print(a[0:3:2, 0:3:2])
# Selects elements from rows and columns starting from index 0 to index 2 (not including index 3)
# taking every second element in both dimensions
[[1 3]
 [7 9]]
10.5.1. Replacing an Element Inside an Array#
b = np.array([[2, 4, 6], [8, 10, 13]])
print("First version: \n", b)

# Replace the last element (13) with 12.
b[1,2] = 12
print("Second version: \n", b)

# Replace the first column with 1 and 2
b[:,0] = [1, 2]
print("Third version: \n", b)
First version:
 [[ 2  4  6]
 [ 8 10 13]]
Second version:
 [[ 2  4  6]
 [ 8 10 12]]
Third version:
 [[ 1  4  6]
 [ 2 10 12]]
10.6. Initializing Commonly Used Arrays#
NumPy offers several built-in functions that allow us to create arrays of different shapes filled with specified values. This is very useful, especially for creating larger arrays. Below is a list of these functions. Note that you don’t need to memorize the syntax, but just know that these functions exist. You can always look them up online when you need them.
Function |
Description |
|---|---|
|
array filled with zeros |
|
array filled with ones |
|
array filled with specified value |
|
array filled with random floats |
|
array filled with random integers between |
|
square identity matrix of shape |
Below are some examples in code. Uncomment the print function if you want to see the results. Note that the shape is again in the format (row, column).
A=np.zeros((2,4))
#print(A)

B=np.ones((3,2))
#print(B)

C=np.full((2,2), 0.5)
#print(C)

D=np.random.rand(2,3)
#print(D)

E=np.random.randint(-5,5, size=(2,3))
#print(E)

F=np.identity(3)
#print(F)
10.7. Reshaping Arrays#
Numpy provides several functions for reshaping arrays. Reshaping changes the dimensions (shape) of the array while preserving the total number of elements.
Function |
Description |
|---|---|
|
to change the shape of an array while keeping the original data |
|
function converts a multi-dimensional array into a one-dimensional array |
|
stacks arrays vertically, i.e., it combines arrays along rows |
|
stacks arrays horizontally, i.e., it combines arrays along columns |
|
stacks arrays along any specified axis |
arr1 = np.array([1, 2, 3, 4, 5, 6])
arr2 = np.array([1, 2, 3])
# reshape
reshaped_arr = arr1.reshape(2, 3)
print("reshaped: \n", reshaped_arr)
reshaped:
 [[1 2 3]
 [4 5 6]]
# flatten
flat_arr = reshaped_arr.flatten()
print("flattened: \n", flat_arr)
flattened:
 [1 2 3 4 5 6]
# stack
arr3 = np.array([4, 5, 6])
arr4 = np.array([7, 8, 9])
# vertical stack
vstacked = np.vstack((arr3, arr4))
print("vstacked: \n", vstacked)
vstacked:
 [[4 5 6]
 [7 8 9]]
# horizontal stack
hstacked = np.hstack((vstacked, vstacked))
print("hstacked: \n",hstacked)
hstacked:
 [[4 5 6 4 5 6]
 [7 8 9 7 8 9]]
# concatinate
stacked = np.concatenate((arr1, arr2), axis=0)
print("stacked: \n", stacked)
stacked:
 [1 2 3 4 5 6 1 2 3]
10.8. Copying Arrays#
To copy an array in another array you can use the copied_arr = first_arr.copy() function.
arr1 = np.zeros((2,2));

# using .copy()
arr2 = arr1.copy()
arr2[0,0] = 4
print ("arr1=\n",arr1)
print ("arr2=\n",arr2)
arr1=
 [[0. 0.]
 [0. 0.]]
arr2=
 [[4. 0.]
 [0. 0.]]
Attention: Note that second_arr=first_arr is different from copying. This just returns views rather than copies of the array data. As a result any change to one array, second_arr, or first_arr, will be applied to both of them.
# using assignment operator
arr3 = arr1
arr3[0,0] = 2
print ("arr1=\n",arr1)
print ("arr3=\n",arr3)
arr1=
 [[2. 0.]
 [0. 0.]]
arr3=
 [[2. 0.]
 [0. 0.]]
10.9. Exercises#
10.9.1. Exercise: Recreating a matrix#
You have just learned about several array creation functions in Section 10.5. Using np.zeros and np.ones, try to recreate the matrix below. You may also use the method of element replacement. Don’t forget to print and check your progress in the intermediate steps to ensure you are on the right track.
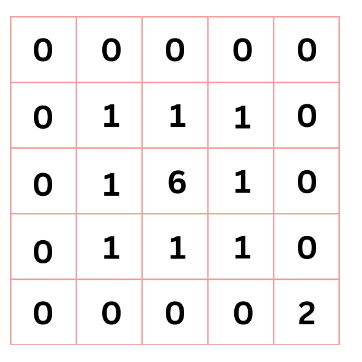
import numpy as np

# Create a 5x5 matrix filled with zeros
matrix = # your code here
print(matrix)
  Cell In[32], line 4
    matrix = # your code here
             ^
SyntaxError: invalid syntax
# Create a 3x3 matrix  filled with ones
inside = # your code here
print(inside)
# Replace the element in the middle of the 3x3 matrix with 6
inside[1, 1] = # your code here
print(inside)
# Fill the middle of the 5x5 matrix with the 3x3 matrix
# your code here
print(matrix)
# Replace the last element of the final matrix with 2
# your code here
print("Final matrix:")
print(matrix)
10.9.2. Optional Exercise: Matrix extraction#
There is a matrix with three different parts marked in different colors. First, create the matrix as an array, and then write three separate codes to extract the values inside each colored box. The green and blue areas should be provided as matrices, while for the pink area, it is sufficient to print only the elements.
💡Hint: You can use a for loop to find the elements inside the pink area.
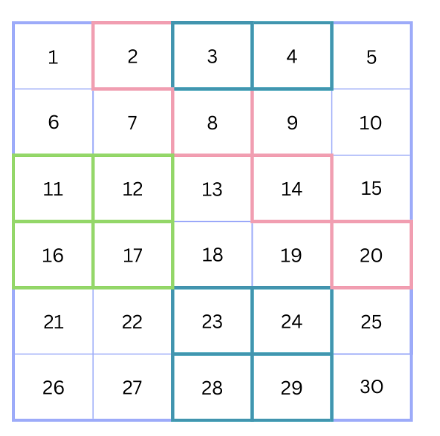
import numpy as np

# Create a list of numbers from 1 to 30 (including 30)
list_matrix = # your code here

# Convert the list into a numpy array
matrix = # your code here

# Reshape it as 6x5
matrix = matrix.reshape(# your code here)
print("Matrix: \n", matrix)
# Green area
green = # your code here
print("Green area: \n", green)
# Blue area
blue = # your code here
print("Blue area: \n", blue)
# Pink area
print("Pink area: ")
for i in range(4):
  pink = # your code here
  print(pink)
10.9.3. Exercise: Array manipulation#
Your task is to complete the following steps:
Create a list of numbers from 0 to 8 using the
rangefunction.Use the created list to create a 3x3 two-dimensional NumPy array by reshaping it.
Replace all the diagonal values in the NumPy array with 0 using a single for loop.
Add two columns filled with zeros to the matrix.
Add one row filled with ones to the matrix. Hint: you can use
[1]*array_2d_0.shape[1](a row filled with 1) as the second argument for the vstack methode.
💡Don’t forget to print and check your progress in the intermediate steps to ensure you are on the right track.
import numpy as np

# 1- Create a list of numbers from 0 to 9 using the range function
number_list = # your code here
print("List: \n", number_list)
# 2.1- Create a numpy array from the existing list
array_2d = # your code here

# 2.2- Reshape the array so it becomes 3x3
array_2d = # your code here
print("Reshaped: \n", array_2d)
# 3- Replace diagonal values with 0 using a single for loop
for i in range(3):
    # your code here

print("Diagonal: \n", array_2d)
# 4- Add two columns filled with zeros to the matrix
# 4.1 make an array of zeros with same number of rows and 2 columns
zeros_column = # your code here

# 2.2 concatenate the new matrix and the old one
array_2d_0 = # your code here
print("Extra columns: \n", array_2d_0)
# 5- Add one row filled with 1's to the matrix.
# 5.1: make one row with same amount of columns as the current array
ones_row = # your code here

# 5.2: concatenate it with the old array
array_2d_1 = # your code here

# Print the resulting numpy array
print("Modified 2D Numpy Array:")
print( array_2d_1)
10.9.4. Exercise: Array manipulation#
Your objective is to perform a series of steps on matrices to explore matrix operations.
Create a matrix A of size 3 by 5 and fill it with zero’s.
Create a new matrix B by selecting only the even columns of matrix A and a new matrix C by selecting the odd colums of matrix A.
Perform following operations on B and C:
C = C+1B += 1Print matrix A and examine the results.
💡Don’t forget to print and check your progress in the intermediate steps to ensure you are on the right track.
import numpy as np

# Step 1: Create a 3x5 matrix A with zeros.
A = # your code here
print("Mtarix A_1: \n", A)
# Step 2: Create matrix B using even columns of matrix A (column indexing starts from 0)
B = # your code here
print("Matrix B_1: \n", B)
# Create a matrix C using odd columns of matrix A
C = # your code here
print("Matrix C_1: \n", C)
# Step 3: Negate all values in matrix B
C = C+1
B += 1
# Step 4: Print matrices A and B
print("Matrix A:")
print(A)

print("Matrix B: ")
print(B)